One weird trick to make pumpkin death-defyingly delicious

IMG_7296Just think—what is pumpkin, but a combination of excrutiatingly delicious orange pumpkin matter, and water. Water is water. It’s great. Stuff of life, 90% of the body, et cetera, et cetera. But it isn’t where the deliciousness lives. In fact, it mingles with the deliciousness of pumpkin flesh and—waters it down.

Who wants something that is watered down? No—one seeks the emphatic, the bold, the pure. Right?

So the trick to making delicious pumpkin and other winter squash is to remove the water. How to do that. Let’s see…there’s this thing that water does…I know, don’t tell me…it requires heat, but not center-of-the-sun heat…just normal, household-appliance-level heat…starts with ‘e’, ends with ‘e’…yes! It evaporates. Water evaporates when applied heat. Pumpkin flesh, on the other hand, does not.

Therein lies the secret. You’re welcome. Water just ups and leaves when things get hot enough. Pumpkin stays for the long haul.

Here’s what I’m trying to say. Imagine you roast a pumpkin (or other winter squash) so the flesh is easy to scoop off the peel. Then, you cook the pumpkin flesh in a pan for a good long time, stirring, stirring; till the steam rises and keeps rising and rising and eventually most of the water becomes the steam and leaves; and what you are left with is an increasingly pasty, gummy, reduced, deeply orange mass.

This takes only a couple ingredients to become one of India’s famed concoctions, to be had as dessert, or as a side with roti, or snuck in between meals from the fridge. Midnight snack? You wouldn’t dare? Done. Pumpkin halwa is great in all these ways.

Pumpkin halwa

Halwa is a general name for Indian desserts that are pastes. Sorry. What that description lacks in glamour it makes up in accuracy. It can be made of a number of widely disparate foods; wheat farina, whole wheat flour, carrot; and pumpkin. When I say ‘pumpkin’ of course I’m using it as a term of endearment for all winter squashes, those with the hard shell and sweet orange flesh. I used kabocha, which is known by foodies to out-pumpkin even the standard autumn pumpkins in terms of taste.

Made sweeter, it is a nice finish to a meal, served in tiny confection bowls; made a little less sweet, goes great as a side with deep-fried puffed breads, i.e. pooris.

Pumpkin halwa

Ingredients:
  • One medium sized kabocha squash or sugar pumpkin
  • 2 tablespoons ghee or butter
  • Seeds of 6 green cardamoms
  • 1 teaspoon sugar or to taste
  • Pinch of salt
Method:

Preheat the oven to 425ºF. Slice the kabocha/pumpkin through the equator and scoop out the seeds with a sharp-sided spoon. I have found it really helps to pick a spoon that matches the curve of the hollow where the seeds are.

Lay the halves cut side down on a foil-lined cookie sheet along with 2 tablespoons water. Bake in oven for 45 minutes.

At that point the squash should be completely soft and easy to prick through with a knife. Bring them out and scoop out all the flesh.

Heat the ghee or butter in a non-stick, thick-bottomed pan. When melted, add the squash and cook on medium-high, mashing it down into the fat and stirring occasionally.

Meanwhile, grind the black inner seeds of the cardamom in a mortar and pestle.

In about 30 to 45 minutes, the flesh should be much drier and also look smoother, as the rough grain disappears with the water content. At this point, add a pinch of salt, the sugar, and the cardamom. Add more sugar after tasting if it is not sweet enough.

Garnish with ground pistachios, slivered almonds, roasted cashews, raisins or any combination.


(Click here to find me on Facebook and here on Twitter.)

Burmese broth with bitter greens

Burmese broth with bitter greens

Burmese broth with bitter greens

Two things that I’m having a lot of fun discovering — one is Burmese cuisine with its fishy umami and floral flavors . The other is the leaves of the bitter melon. I can’t decide which to be more excited about; but when you combine them? An explosion of flavors!

So let me tell you what I know about both. I have always loved the bitter melon (karela). This is a cousin of your garden-variety cucumbers and cantaloupes, but its seeds are large and hard, its skin is bumpy, and its flesh is scanty and bitter. Certainly for special tastes; but once your tongue has learned to love it, you really love it.

Bitter melon grrens

Bitter melon greens

But then, I recently discovered that its leaves are edible too. One finds them at the farmer’s markets in San Francisco that serve an ethnic clientele. They are sold in giant bunches for a dollar. I leave with my wallet almost intact, and my shopping bag full to bursting with greens, the tendrils spilling over the top.

One of the most enchanting things about buying a bunch of bitter melon greens is the baby gourds one finds attached to some shoots. Normally the gourds are at least six inches long, but with every purchase you also get some baby gourds, some no bigger than your finger tip. These can be thrown into the pot along with the greens, they do not need much cooking.

A baby bitter melon compared to an onion

A baby bitter melon (karela) compared to an onion

Those of you who want to like dandelion leaves, but find that they are just a little too bitter to enjoy, might love the bitter melon leaves. They only have to be cooked long enough to wilt, and have a complex, grassy bitter-tinged flavor.

Now about Burmese cuisine. I admit I don’t know much about it but I’m starting to learn. I recently got a Burmese recipe book; but rather than make any recipe from it, I tried to understand the techniques and flavors and tried to imbue this particular broth with the Burmese gestalt. At the risk of causing derisive laughter among any Burmese readers, I made what I like to think of as a Burmese broth. Unlike Indian food, it only gently cooks onions; it uses lemongrass infusion; and it uses fish sauce instead of the more Chinese soy.

We loved it with some white rice. please let me know in comments if you did too.

Soften vegetables

Soften vegetables

Vegetables in pot

Vegetables in pot

Softened

Softened

Lemongrass

Lemongrass

Add greens

Add greens

Serve

Serve

Burmese broth with bitter melon greens

Ingredients:
  • Leaves and baby gourds from 1 bunch of bitter melon greens (about 4 cups)
  • 4 big cloves garlic finely minced
  • 2 medium tomatoes sliced
  • 1 chili sliced
  • half onion diced or sliced
  • 1 cleaned stalk of lemongrass (optional)
  • 2 tbsp oil
  • 1.5 cups chicken broth
  • 1 tablespoon fish sauce
  • salt to taste
Method:

Put oil, onions, tomatoes, garlic and chili all together in a thick-bottomed pot and cook gently until softened (about ten minutes). The tomatoes should have liquefied and somewhat dried by now, if not cook a few minutes longer. Now add the broth, the fish sauce, and the lemongrass. Bring to a boil and simmer for ten minutes or so. Add the greens, and allow them to wilt. Turn off the heat.

Serve in soup bowls, with soup spoons and chopsticks for lifting the greens, and some white rice on the side.

(Click here to find me on Facebook and here on Twitter.)

An excellent use for loofah in the kitchen

Loofahs are pretty useful little scratchy devices that one can use as scrubbies, usually in the bath on your pretty pink toesies. That’s great and all, but does my kitchen have any use of them? Yes.

Start with this:

Loofah

Loofah

And go back in time several months at which time it looked like this:

Ridged luffa squash

Ridged luffa squash

At this point, loofah can be used to make an excellent meal. When these gourds are harvested green, the flesh is soft and delicious with a hint of sweetness. Leave it on the vine, and the flesh becomes fibrous and scratchy.

When young, I always knew this vegetable as ‘toori’. Its true name is luffa, which is where the more fancy appellation ‘loofah’ comes from. Now I love toori so much that if I was the farmer in whose job it was to grow a crop for loofahs, not many would make it that far.

Ridged luffa squash with garlic and tomatoes

Ingredients:

  • 3 largish ridged luffa squash or equivalent amount
  • 3-4 large cloves of garlic
  • 1 large or 2 small tomatoes
  • 3 fresh green chilies or to heat tolerance
  • 6 or so curry leaves
  • Half a teaspoon mustard seeds
  • half a teaspoon turmeric
  • 1 teaspoon coriander powder
  • salt to taste
  • 2 tablespoons oil

Method:

Peel the squash with a vegetable peeler; for the first pass, center the peeler on the ridges; once the ridges are removed, the second pass will remove the rest of the peel.

IMG_0764 IMG_0765 IMG_0763 IMG_0767

The flesh inside is soft and pale. The seeds, at this stage, are not developed into being hard and can be eaten. Chop up the flesh into cubes. Mince garlic and the chilies. Chop up the tomato.

Heat oil in a thick-bottomed pan on medium-high heat. When it shimmers, put in the mustard seeds and wait till they start popping. Then put in the minced garlic and chilies, and the curry leaves (I didn’t have these so I left them out). When these start to shrivel, you can put in the chopped tomato.

toori and spoonrest 001

Now the standard with this type of dish is to let the tomato liquid boil off. This intensifies the flavor of the tomato. So keep the heat on medium-high, and stir the tomatoes once in a while, helping it along by crushing it with the back of your spoon.

Once the tomatoes seem pretty dry, put in the turmeric and coriander powder. Stir. Now put in the squash cubes and give them a stir to coat with the spices. Add the salt, use your judgment about the amount. Cover with a lid, bring to a boil (no added liquid is necessary, the salt will draw out the high water content of the squash flesh itself). When it comes to a boil, leave it with the lid on at a simmer.

toori and spoonrest 003 IMG_0768

In another 15-20 minutes, the squash will be much reduced, and done. If you want, garnish with minced cilantro.

IMG_0771

This goes very well with roti/chapati, or as a side with rice and dal.

The doofus

Somebody stop me I feel a thesis coming on. It is about this vegetable:

Kaddoo

Kaddoo

This is not the kind of vegetable that one expects paens to be written about. It is found anywhere that vegetables are sold in India; and being India, that could be a basket at a railway platform or a sheet laid out on the sidewalk:

vegetable market

vegetable market selling kaddoo and other things

A vendor sorts vegetables next to a railway track as a train passes by, in Dhaka on September 10, 2012. (Andrew Biraj/Reuters)
A vendor sorts vegetables next to a railway track as a train passes by, in Dhaka on September 10, 2012. (Andrew Biraj/Reuters)

Sidewalk vegetable seller from suvisworld.wordpress.com/

Sidewalk vegetable seller from suvisworld.wordpress.com

It is known to me and other Sindhis as ‘kaddoo’. It is so devoid of glamour that if you call someone a ‘kaddoo’ you may as well call them a doofus. But don’t underestimate it, because the kaddoo has mystique. For one thing, it is one of the oldest cultivated plants in the world. Humans have been eating it for ten thousand years. Recently some stands of wild kaddoo were discovered in Zimbabwe, which is probably where it originated. News of the cultivated kaddoo seems to have spread like wildfire, from Africa to Asia to the Americas; the kaddoo discovered America before Columbus.

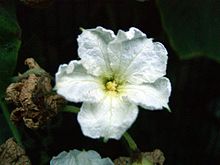
Check out its pretty flower:

Kaddoo flower

Kaddoo flower

Like other plants from the Cucurbitacae family (squashes, melons and gourds), it is a vine and climbs by means of tendrils. Kaddoo flesh is pale, watery and very mild. Some would say boring. It cooks down to become squishy and somewhat gelatinous. The skin is thin and pale green, but one does have to peel it before cooking. The seeds of the young fruit are quite edible.

Calabash

Calabash

So where is the mystique? I knew that kaddoo is also known as lauki, bottle gourd, opo or dhoodhi, but I didn’t know that it also goes by the romantic name of Calabash. In India we mostly eat this as a young vegetable, when its peel and seeds are rather soft. But apparently when it ages, the peel hardens, the flesh dries up, leaving a sort of bottle behind; In this form, it is called a calabash. It has been used by old cultures as a vessel, or even as a musical instrument. Apparently the fact that the size of these gourds roughly matches the size of the human head gives it its resonant qualities.

Sitar parts

Sitar parts

SitarKaddoo

Musical instruments, hmm…what kind? Some tribal folksy thing no doubt, that street performers play and bystanders throw change at? Sure…but also, think Ravi Shankar and the sitar. The calabash is used for the shell of the deeply buzzy and resonant sitar…the main resonating chamber of which is called…wait for it…the kaddoo.

QED.

Kaddoo koftas in gravy.

kaddoo koftas

kaddoo koftas

Ingredients:

  • One large kaddoo, peeled, quartered and seeded
  • Quarter cup besan
  • Half a teaspoon coriander powder
  • Some sprinkles red chili powder
  • One teaspoon aamchur
  • Salt to taste
  • 4 – 5 tablespoons oil
  • One recipe of browned onion tomato gravy

Method

Grate the kaddoo quarters. Salt it with about a teaspoon of salt and mix it with your fingers. Leave the grated kaddoo aside for about half an hour; during this time the salt will draw out most of the moisture.

IMG_0618 IMG_0619

Now you can do the rather tedious task of squeezing out the water from fistfuls of kaddoo my means of your hands. Save the water, it has some kaddoo-ness and we will use it later.
IMG_0629 IMG_0630

Meanwhile start off the process of making the browned onion tomato gravy. When it calls for water (at the end) use the kaddoo water, would you please? Lets not waste it.

The volume of the grated kaddoo will have much reduced, and it will be dry. Put in the besan and the dry spices. You do not need more salt. Mix it with your oiled fingers; it should now be amenable to form patties. Form about 6 patties and leave them side by side on a plate.

IMG_0633 IMG_0635

Panfrying them is next. Heat a non-stick pan with oil about an eighth of an inch deep. When nice and hot, put in the patties with liberal gaps around, and sort of flatten them. Let them cook for 5 – 7 minutes or until they brown at the bottom; flip them, some more oil perhaps, and cook for another 5 minutes.

The patties are ready, all that is needed is to slip them into a nicely simmering pot of the browned onion gravy.

IMG_0636 IMG_0637

And you are done. This dish goes very well with rotis/chapatis.

I have a bitter and prickly friend…

…that I would like you to meet. It goes by many names — bitter gourd; bitter melon; karela in Hindi; ku gua in Chinese; but more properly, it is known as Momordica charantia. I know, Dear Reader, that you don’t appreciate my bitter and prickly friend. I apologize if you are one of the handful who do appreciate the karela (Hi Rashmi!) but I can probably count the lot of you in Roman numerals that I’m actually quite weak in.

But I’m about to tell you that if you enjoy the occasional hoppy beer; if you don’t freak out about some frisee in your salad; or like some strongly brewed coffee, or better still, your shot of espresso; and who besides my seven-year-old doesn’t like dark chocolate? — you will probably enjoy the Momordica. Plus, its got some major diabetes-fighting skills.

toor dal and karela 004

Karela is an oblong, prickly, warty fruit of a vine that originated in India, from the same family as the various melons, pumpkins, squashes and cucumbers. The resemblance in looks to the rest of its cousins is clear, but the taste, I believe, is rather unique. It is picked and eaten while it is still green. For years I assiduously peeled and seeded the gourd before preparing it, but lately I realized that both the peel and the seeds are edible, and in fact, in this preparation, the seeds add a welcome crunch. I’m all for cutting out steps from food preparation, so now when I prepare karela, I rinse them, slice them, and I’m good to go.

There are many preparations of the karela that add spices and tang to mitigate the bitterness. This method utilizes another trick — it crisps them up. At some point I will write up other, more complicated recipes for bitter gourd, but this is the simplest, and very, very addictive.

Step 1: slicing.

toor dal and karela 005

Rinse, dry and de-stem the bitter gourds. I used three of the smaller Indian variety. With a sharp knife, slice them up into eighth of an inch slices, peel, seeds and all. Don’t worry if you lose a few seeds while slicing. It is more important to keep an even thickness of slice than to get it to be exactly an eighth or a quarter of an inch wide, so that they all cook evenly.

Step 2: saute.

Heat a couple tablespoons of oil in a wide, non-stick pan. A crepe pan, or dosa pan, if you have such, would be ideal. If not, any Calphalon will do. When the oil shimmers, lay out the slices in a single layer, like so:

At this point, lightly salt around the slices, and wait for about 10 minutes, motionless. Oh — you can move, but keep the slices motionless. You might press down on one or two of the recalcitrant slices to ensure touch-age.

toor dal and karela 007

Step 3: flip.

toor dal and karela 015

As for when to flip the slices over, I would say this — be fearless, and have patience. You might see some start to brown at the bottom. Peek at a couple if you like. At any rate wait ten minutes on medium-high heat. Use a spatula and a fork, one in each hand (the fork to give you leverage), and start flipping. Drop a few more drops of oil on the pan and swirl around. Sprinkle some salt on this side as well. Be conservative, you can always salt more later. Let them cook another five minutes.

Step 4: Remove and add spice.

toor dal and karela 017

At this point, most of the slice will be done and crisped up. Remove them into a plate, and toss with a few sprinkles of red chili powder. If you want to do like the street vendors in India do, make cones of newspaper, throw the karela in it, sprinkle the red chili on, and give it a few hearty shakes while holding the flaps closed. Enjoy.

Efficient butternut-tomato soup

A quick and easy soup that can be done quickly for a weeknight dinner but does not sacrifice flavor at all. This amount of soup was enough for four as a soup course, or for two as dinner.

Step 1: Squash.

butternut squash soup 001

Start with about half a medium butternut squash. Or you could go with pumpkin, but as you can see, I went with butternut. Put some water on the dish and stick it in the microwave for 5 minutes.

Step 2: Deseed and peel.

butternut squash soup 002

The squash comes out softened and partially cooked, as seen above. Cut in half across, it becomes very easy to deseed with a scoop-shaped spoon, as pictured below. As far as the seeds go, I like to chomp on a few of them as they are, the shell and the pith notwithstanding.

butternut squash soup 006

The peel easily pares off with a sharp paring knife. Chop up the flesh into cubes and have it ready to go into the soup.

butternut squash soup 008

Step 3: Aromatics.

I used an inch-long piece of ginger and chopped it into thin strips thusly.

butternut squash soup 004

Now, heat about three tablespoons of extra virgin olive oil in a pot and saute the ginger strips, along with one bay leaf, for a few minutes.

Step 4: Broth and everything else

butternut squash soup 009

Throw in the squash, along with one chopped tomato. I used an orange tomato, not in order to match the squash, but just because that’s all I had. Also put in 3 cups of chicken broth, some salt to taste, and bring to a boil.

Keep it at a healthy simmer for about fifteen minutes.

Step 5: Soupify and correct seasoning.

Now, the soup is ready for its journey through the blender. Pull out the bay leaf first of course! Once smooth, you have the choice to strain it. We did, but used a strainer with rather large holes, to make it easier on ourselves. Return the soup to the pot, and check for salt, and also sweetness. I found the squash I used somewhat lacking in sweetness, and added a few squirts of balsamic vinegar to complement it. Heat it through, mix it, and serve.

butternut soup 2 001