Cauliflou, cauliflower, cauliflowest

I adore cauliflower. I know, that is not a statement one is likely to hear often. But I do. That strong sulphuric smell when I steam and then roast cauliflower is enough to send me into a tizzy. I grew up on rice steamed with cauliflower for lunch every week day, and I tell you, you haven’t smelled white rice cooking until you’ve smelled it cooking with cauliflower.

All right, all you unsympathetic ears. I made this dish for a housemate once, and he said he had never, before then, actually enjoyed cauliflower. Plus there are the incredible cancer-fighting, DNA-repairing traits of cauliflower that it shares with its cruciferous brethren like broccoli, cabbage, kale, and so on.  So here is a simple way that can be included in any Indian meal, with chapatis or naan, with rice and dal; or with any Western meal that has strong flavors as the vegetable side. Or — what the heck — put it in a burrito.

Presenting Gobi Masala done in a Sindhi way.

Ingredients:

Half a head of cauliflower, rinsed and chopped into thin florets, none wider than half an inch

Half a teaspoon whole cumin seed

Few sprinkles of asafetida

Half a teaspoon red chili powder

Half a teaspoon turmeric powder

One teaspoon coriander powder

One inch piece of ginger minced

One-two serrano chilies, sliced

One medium tomato, choopped

Salt to taste

Chopped cilantro to garnish

Method:

Heat 3 tablespoons of oil in a thick-bottomed pan on medium-high. When it shimmers, put in the asafetida, the cumin seeds, and the red chili powder.

cauliflower 002

Gobi masala : spices

They will sizzle presently. In go the ginger and serrano chili. They will start to look blistered.

cauliflower 003

Gobi masala: ginger and chili looking sizzling

Now it is time for the cauliflower to go in. Stir to coat with the oil. Sprinkle with salt. Stir occasionally, while leaving the pan uncovered, on medium-high.

cauliflower 005

Gobi masala: cauliflower coated with oil and spices

Fifteen minutes later, some of the florets will show some translucence on the stems, and some browning on the buds.

cauliflower 006

Gobi masala: some browning on florets

Now, put in the coriander, turmeric, and tomatoes, some extra salt to taste, and stir to coat the florets once again.

cauliflower 007

Gobi masala: tomatoes added

Cover, lower the temperature to medium, and let it cook for another ten minutes. At the end, garnish with cilantro.

cauliflower 014

Gobi masala: complete with garnish

Roti from the mountains

From the nuances of rotis from the flatlands of India, let’s go across the border to Nepal, where they have a different take on roti entirely. Here wheat flour does not feature at all in any form, nor for that matter any grain. A non-grain-based roti! I am intrigued.

Instead, phapar ko roti, which merely means buckwheat roti, is made out of the flour of the seeds of the buckwheat plant. Not being a grass (in fact, I have some growing in my garden, and it has club-shaped, distinctly non-grass-like leaves), buckwheat seeds are not properly considered a grain at all.

Perhaps that is a tad too clever. At any rate buckwheat seeds are turned into flour, turned into breakfast cereal, turned into noodles, risen with yeast, and in most ways eaten like a grain.

I came upon buckwheat by way of Santa Cruz, California, where my husband first discovered buckwheat pancakes. I recreated them at home, and since then we have been big fans of the distinctly…umm…muddy (meaty?) taste of buckwheat.

A flat, savory buckwheat crepe was a completely new concept for me when I heard about it from my Nepali friend. I’m always looking for new taste sensations, so let’s get started — Phapar ko roti.

Ingredients (just two, as in the more familiar wheat roti)

phapar ko roti 002

Quarter cup of buckwheat flour

1/4 cup buckwheat flour

1/4 cup + 1 tbsp water

(this much is enough for one serving, increase as needed)

Method:

phapar ko roti 003

Buckwheat flour: stir with whisking motion

Phapar ko roti batter

Phapar ko roti batter

Stir the water in with the buckwheat flour using a sort of whisking motion until you get a batter that can be poured. Feel free to adjust either the water or the flour. Heat a large non-stick pan on medium-high. Now the recipe I read actually suggested not using any oil at all; I tried that, but all I got was a mess.

phapar ko roti 010

Phapar ko roti: my lovely mess

phapar ko roti 011

Phapar ko roti: second attempt

So next I tried using a teaspoon of oil on the Calphalon pan, spreading it around, and then pouring my batter on. Tilt the pan this way and that to get the batter to spread. It will start to set very quickly. I flipped it over in a matter of ten or twenty seconds, when most of the top surface has set. Cook on the other side for about another twenty seconds.

Take it off the pan. Here is my lunch:

phapar ko roti with radish achaar

phapar ko roti with radish achaar

I will have to blog the Nepali radish pickle another time. The flavor of the roti was very mild and made a good substrate for a spicy side.

Rolling the roti half a world away

In my home in Bombay, we never bought flour, we bought wheat. And we didn’t buy wimpy five-pound bags either. We bought enough wheat in bulk to fill up a tin canister as tall as one’s knees. Once a month or thereabouts, we would hire a neighborhood working lady to hoist that tin canister up on her head and carry it to the neighborhood burr mill. They would stone-grind the wheat into flour, completely whole — germ, bran and all — which they would testify to by weighing the product before and after. The burr mill would single-file through the customer requests, in order to be able to testify to flour wholeness.

This is chakki ka atta (translated: burr mill flour), that we used rest of the month to make chapati (roti), poori, or paratha.

Let’s start with the simplest of them, the chapati. There are just two ingredients — water and flour.

Kneaded together, a new ingredient magically comes alive inside the dough. This is gluten, the protein that is formed inside dough in the presence of water. Gluten is what gives dough its stretchiness and its stubbornness. Wheat dough is not just pliable — it wants to fight back. It takes a shape, but wants to go back to its previous shape. The pliability; the ability to hold a shape; the elasticity; all this is because of its gluten.

I like to imagine multitudes of tiny balloons inside the dough, all of which can be blown up without breaking, while keeping the dough from breaking into bits. These gluten balloons fill up with air so bread can rise and hold all the air inside instead of escaping. The gluten balloon allows chapatis to puff up with steam.

That brings me to a common misunderstanding — chapatis/rotis are often called the unleavened flat breads of India. But they are not unleavened. Leavened just means risen, and rotis are indeed risen, at the last minute of cooking, when they puff up with steam. Steam leavening is a respectable form of leavening that is probably the most ancient. I picture housewives in the Indus Valley civilization slapping circles of dough on their wood-burning griddles and watching them puff up.

They are unfermented, however, and no external leavening agent like yeast or baking soda are added.

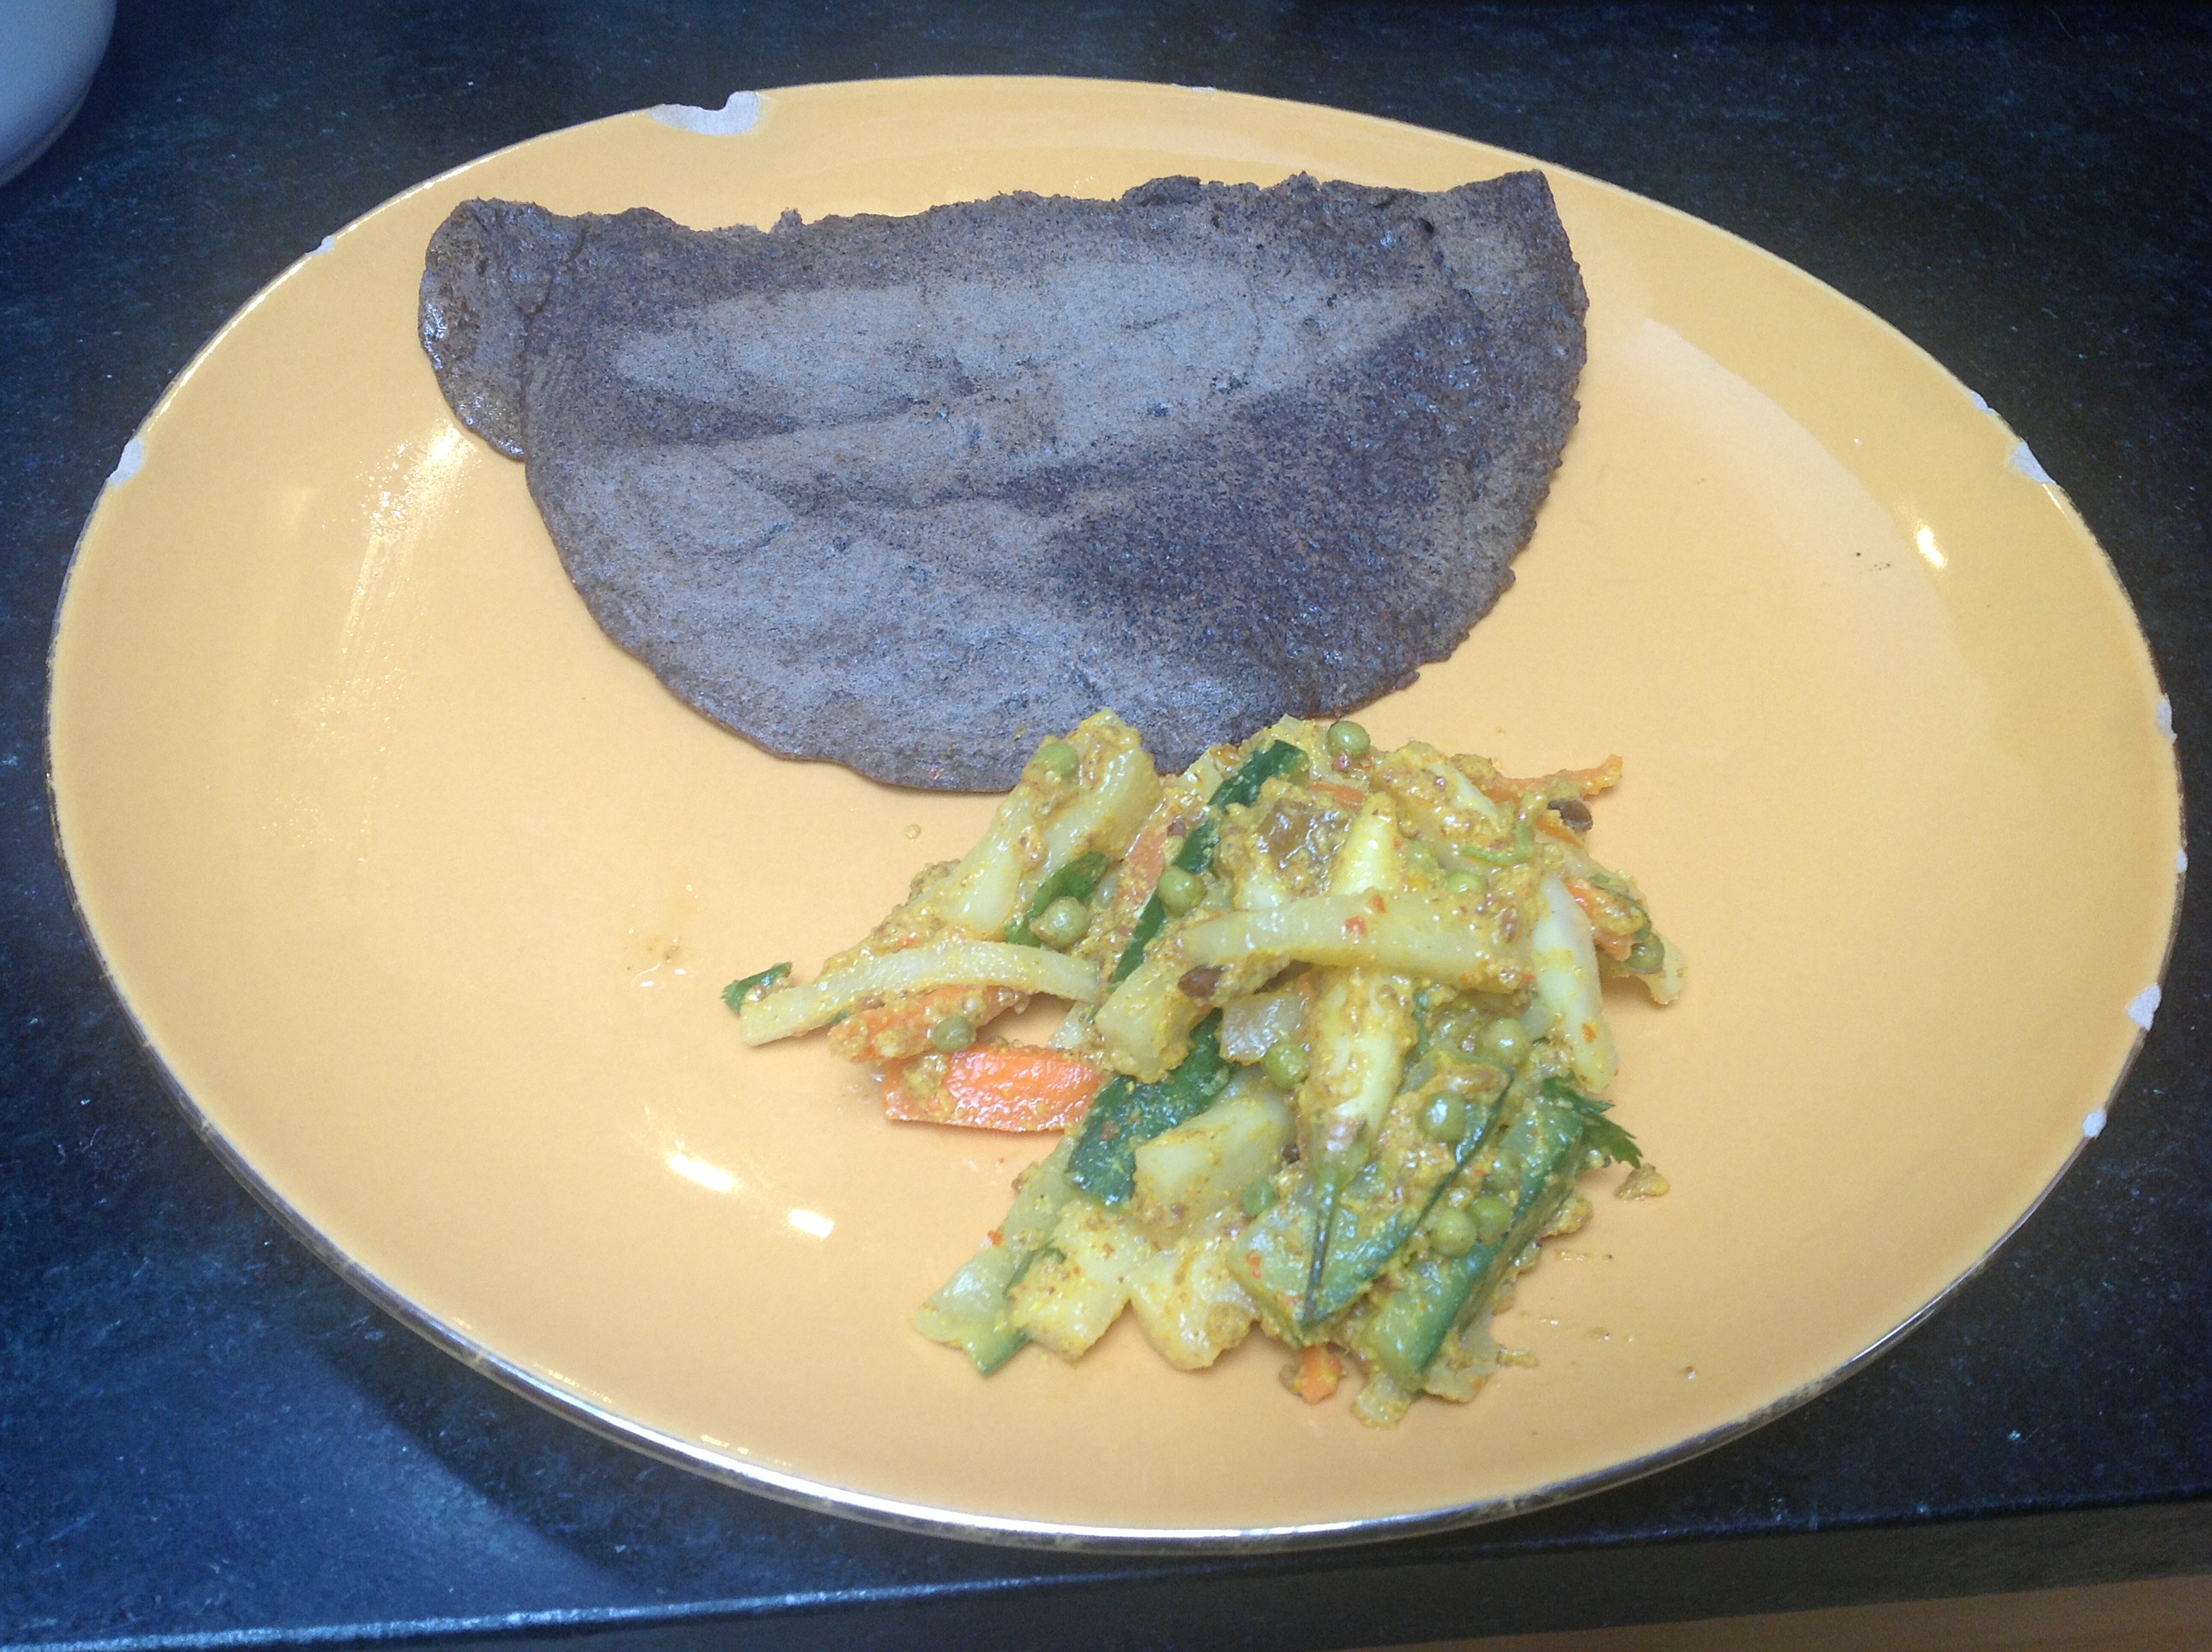
During my childhood we had a chapati meal for either lunch or dinner every day. Two circular chapatis with a few dark brown spots, folded into quarters. A dal, a vegetable and a cup of yogurt completed the meal. When this is everyday food, one scorns it; half a world away in California, deprived of one’s neighborhood burr mill, a source of wheat, and the proper chapati-making expertise, it becomes an undertaking.

For years I tried to approximate chakki ka atta in California by mixing half and half of whole wheat and all purpose flour. But I was never thrilled about the lack of wholeness there (yes I’m a bit of a fanatic); and one day I used straight whole wheat, the rotis came out perfectly fine, so I have stuck with that. This makes sense — the species of wheat used for bread-making in the West (triticum aestivum) is the same as most of the wheat grown in India, mainly for the use of making chapatis. (There are many different subspecies though.) The grain size of chakki ka atta is probably smaller. But I haven’t found this to be a huge problem. I use King Arthur’s Premium Whole Wheat flour and get perfectly good, puffed up, rustic rotis.

Ingredients:

2 cups whole wheat flour

3/4 cup + 3 tbsp water

Method for dough:

roti 010

Making roti: whole wheat flour and water

Put the flour in a bowl, make a sort of well in the center, and pour the water in. Use a spoon or a chopstick to stir the water into the flour till you get a shaggy mass and most of the flour is moistened. Cover with a plate, and walk away for 10 minutes or so.

roti 012

Making roti: a shaggy mass

Why? The short wait gets the process of the flour absorbing the water started, and just allows the kneading to happen faster. It’s the lazy person’s method — allow time to do the work that you would have otherwise had to expend elbow grease for.

If the 10 minutes stretch to 20 minutes, that’s fine too, but do cover the flour, to prevent it from drying out.

Come back to your dough and combine it into a rough ball with your fingers. This should be relatively easy to do (should take just a minute) but will still have a shaggy appearance.

roti 015

Making roti: a shaggy ball

Now the kneading begins. Clear a 2′ by 2′ square on your counter and place the dough there. Push it, squeeze it, fold it; squeeze it and fold it over and over again, for about 7 minutes. Use your strength. Be firm with the dough. From a shaggy mass the dough will become satiny smooth and hold together in an oblong. It should feel a lot like human muscle when squeezed, but more like slack than taut muscle. If too sticky, add some dry flour, spoon-by-spoon; if too taut, spread it out flat, sprinkle some water on it, and incorporate it with more kneading.

roti 016

Making roti: completed dough

Keep it aside for half hour or so before making rotis with it. The extra wait allows the gluten to relax. This is a lot like exercising: the way one pushes one’s muscles to work, until they feel a little too taut; then one waits a few minutes to relax before exercising some more.

Coat with oil on the outside to keep from drying out. If you want to stash it for another day, it will be good in the fridge in tupperware for a week or even two.

Method for rolling and roasting chapatis

Step 1: Make a few golf-ball-sized balls. I make around 8 (the evening’s dinner amount), roll them to make smooth balls, flatten them slightly into disks, and cover with flour to keep from drying out.

roti 021

Rolling rotis: make flat disks covered with flour

Step 2: Roll. Start with the first disk you made. This gives it a few minutes to relax after being handled. Use a good heavy rolling pin and roll out into a thin disk about 6-7 inches in diameter. You will need to sprinkle some dry flour on the counter and on the dough to keep it from sticking; here I use all purpose, but whole wheat will do as well.

roti 022

Rolling roti: thin six inch circle

Step 3: Roast. Have a griddle on medium-high heat. No oil needed. When hot, slap a disk on. Wait thirty seconds; the chapati will start to show small bubbles. Flip. Wait another thirty seconds; this time the small bubbles will combine into a few bigger bubbles.

roti 026

Roasting roti: ready for first flip

roti 027

Roasting roti: ready for second and final flip

Now you have a choice. Either flip once again for the last time, wait thirty seconds (hopefully it should puff out more) and take the chapati off the griddle.

Or, turn on the flame on a separate burner, and flip the chapati onto the open flame using the burner grate to place it on. It should puff up in a few seconds. Turn off the flame and pull it off with tongs. Don’t leave it on longer than ten seconds or so, because it will burn.

Roti: puffing up on burner

Roti: puffing up on burner

If you want, sprinkle some ghee on top of the still hot chapati.

Some of these steps take practice. So get thee to the kitchen and get started!

The lowly loli: an ancient Sindhi breakfast

During my mother’s childhood in Sindh, her breakfast every single morning was loli. It was the cornflakes of her day.

What is a loli? It is a whole wheat flat bread (roti) with spices, basically — but here is the interesting thing — it belongs more to the pie crust family than the bread family. The reason I say that is that it employs a twist in its mixing. Instead of adding water first and then fat, the fat is added in first; combined thoroughly with the flour to make sort of breadcrumb-sized balls, then just enough water is put in, just enough to combine. No kneading necessary, just a coming together.

No kneading — hence, not bread, in short. Gluten is not developed.

If you think of the way pie crust is made, it shares its basic method with the loli. Fat is cut into the dry flour, thereby creating pellets of floury fat, then water is added just enough to make it combine into a ball. Then it is rolled out, and the result is a rough, uneven circle, that cracks in various places, but holds together enough to lift carefully from place to place. This method results in a flaky pastry that does not exhibit the stretchy integrity of bread or roti, where the gluten does a lot of the work.

Lolis are similarly flaky, except of course they are spicy, not sweet. So let’s get started. This amount makes enough breakfast for two.

Step 1: Dry mixture

loli 001

Spices for loli: onion, chili, cilantro

Chop finely a third of a medium red or yellow onion; two serrano chilies; a third of a cup of cilantro. Add to this 3/4 cup whole wheat flour (I use King  Arthur’s premium whole wheat) and 3/4 teaspoon salt. Stir with your fingers, taking care to break up the onion bits into its layers.

Step 2: Fat

loli 002

Loli flour with spices and oil rubbed in

In the old days, one added ghee; I have to admit I use pure olive oil or other cooking oil now. Add about two tablespoons oil to the flour and stir nicely with your fingers, until you get a breadcrumb texture.

Step 3: Water

loli 004

Loli dough, combined

Add two tablespoons of hot water (why hot? I don’t know. I do as I’m told). Combine it gently with the flour, not to knead (see above) but just to bring it into a ball.

Step 4: Roll

Take about a tennis ball sized amount: there should be about two tennis balls in the dough that you made. Flatten with your fingers into a circle, either by patting, or by rolling out. The circle will be about a quarter to an eighth inch thick and crack in various places, but try to hold it together. Make diagonal lines on it with a knife to get it to cook on the inside.

Step 5: Cook

loli 005

Cooking loli – first flip

Heat a griddle or tawa on medium high heat. When hot, slap the loli on. Wait one minute, then flip.

loli 006

Cooking loli – second flip

Wait another minute, and flip again. Wait another minute, spread some ghee and oil on the surface, and flip again.

loli 007

Cooking loli — third flip

Wait another minute or thirty seconds, spread another few drops of ghee or oil on the surface, and flip one last time. Thirty seconds or a minute more and you are done.

loli 008

My rough and rustic loli

Have it with some nice hot sweet tea.
(Click here to find me on Facebook and here on Twitter.)

I have a bitter and prickly friend…

…that I would like you to meet. It goes by many names — bitter gourd; bitter melon; karela in Hindi; ku gua in Chinese; but more properly, it is known as Momordica charantia. I know, Dear Reader, that you don’t appreciate my bitter and prickly friend. I apologize if you are one of the handful who do appreciate the karela (Hi Rashmi!) but I can probably count the lot of you in Roman numerals that I’m actually quite weak in.

But I’m about to tell you that if you enjoy the occasional hoppy beer; if you don’t freak out about some frisee in your salad; or like some strongly brewed coffee, or better still, your shot of espresso; and who besides my seven-year-old doesn’t like dark chocolate? — you will probably enjoy the Momordica. Plus, its got some major diabetes-fighting skills.

toor dal and karela 004

Karela is an oblong, prickly, warty fruit of a vine that originated in India, from the same family as the various melons, pumpkins, squashes and cucumbers. The resemblance in looks to the rest of its cousins is clear, but the taste, I believe, is rather unique. It is picked and eaten while it is still green. For years I assiduously peeled and seeded the gourd before preparing it, but lately I realized that both the peel and the seeds are edible, and in fact, in this preparation, the seeds add a welcome crunch. I’m all for cutting out steps from food preparation, so now when I prepare karela, I rinse them, slice them, and I’m good to go.

There are many preparations of the karela that add spices and tang to mitigate the bitterness. This method utilizes another trick — it crisps them up. At some point I will write up other, more complicated recipes for bitter gourd, but this is the simplest, and very, very addictive.

Step 1: slicing.

toor dal and karela 005

Rinse, dry and de-stem the bitter gourds. I used three of the smaller Indian variety. With a sharp knife, slice them up into eighth of an inch slices, peel, seeds and all. Don’t worry if you lose a few seeds while slicing. It is more important to keep an even thickness of slice than to get it to be exactly an eighth or a quarter of an inch wide, so that they all cook evenly.

Step 2: saute.

Heat a couple tablespoons of oil in a wide, non-stick pan. A crepe pan, or dosa pan, if you have such, would be ideal. If not, any Calphalon will do. When the oil shimmers, lay out the slices in a single layer, like so:

At this point, lightly salt around the slices, and wait for about 10 minutes, motionless. Oh — you can move, but keep the slices motionless. You might press down on one or two of the recalcitrant slices to ensure touch-age.

toor dal and karela 007

Step 3: flip.

toor dal and karela 015

As for when to flip the slices over, I would say this — be fearless, and have patience. You might see some start to brown at the bottom. Peek at a couple if you like. At any rate wait ten minutes on medium-high heat. Use a spatula and a fork, one in each hand (the fork to give you leverage), and start flipping. Drop a few more drops of oil on the pan and swirl around. Sprinkle some salt on this side as well. Be conservative, you can always salt more later. Let them cook another five minutes.

Step 4: Remove and add spice.

toor dal and karela 017

At this point, most of the slice will be done and crisped up. Remove them into a plate, and toss with a few sprinkles of red chili powder. If you want to do like the street vendors in India do, make cones of newspaper, throw the karela in it, sprinkle the red chili on, and give it a few hearty shakes while holding the flaps closed. Enjoy.

Sweet and sour pigeon peas — tuar dal

Here is one reason to relish your pigeon peas — it is the first legume to have its genome completely sequenced! Now isn’t that appetizing! Here is the other reason — they are delicious.

Pigeon peas are known as tuar dal or toor dal in India, where they are used from south to north, from east to west. When mature, the full lentil looks like a dried beige pea. But the way they are used normally is after having the outer husk removed, and split into halves, so they look like little yellow half-spheres. This, by they way, is how most dals (lentils) are commonly eaten — husk removed and split into halves.

In my family we had soupy tuar dal with rice at least once a week. Its deep musky flavor seems to take very well to some added sweetness and tang. Of course that means the holy pairing of jaggery and tamarind. I could go into a deep digression about each of those, but suffice it to say that you can use brown sugar instead of jaggery, and lemon instead of tamarind; let’s stay on our musky subject of the day, people — tuar dal. Eyes on the ball now.

Step 1: soak and boil.

toor dal and karela 001

I started with 3/4 cup of the stuff. Work night dinner means I don’t have the luxury to allow it to soak for a couple hours; so I rinse, and soak in near-boiling water for just about fifteen minutes, and see the volume double. I learned this trick from Madhur Jaffrey and it has served me well.

toor dal and karela 002

Now, time to boil it. Half a teaspoon of turmeric goes into a pressure cooker, the rinsed and drained tuar dal goes in next, and 3 cups of water. Cover the pressure cooker and let it come to a boil; turn it down and cook, pressurized, for twenty minutes. If you don’t have a pressure cooker, a regular saucepan will do, but the time stretches to an hour and a half. Leave the lid open in this case, at first, because as it first comes to a boil, the lentils will spew like a volcano, and leave watery lava all over your burner.

Once this is done, add salt to taste, half a teaspoon of tamarind paste, and a small piece of jaggery. If you don’t have tamarind use lemon juice, and if you don’t have jaggery use a teaspoon of sugar. Leave the dal uncovered on a low simmer while you prepare the seasoning, stirring occasionally.

Step 2: Seasonings

For the fat in this dal, I used one tablespoon of ghee. There are a few dishes where I opt for ghee instead of oil because of the the lusciousness it gives the result. Butter is a substitute, but I have never tried it.

For the seasonings, I used asafetida, red chili powder, cumin seeds, mustard seeds and fenugreek seeds, in that order.

The seasoning of lentils, known in central India as vaghar, and in the north as tadka, takes some special sequencing. Use a small but thick-bottomed pan to heat the fat in. First, the asafetida can go in pretty quickly, as soon as the fat heats up a little. It will foam in seconds. Now put in half a teaspoon of red chili powder.

toor dal and karela 010

Then, in a few seconds, a teaspoon of cumin seeds. They will also sizzle in seconds. Wait a few seconds and put in a teaspoon of mustard seeds. Now, wait.

Wait.

Wait about 30 seconds. The seeds will first make sizzling sounds, then each little ball will pop and you will start to hear popping sounds.  At this point, put in one teaspoon of fenugreek seeds.

toor dal and karela 013

A note on fenugreek seeds. If they saute long enough to turn dark brown, they will be hard and bitter. So to avoid that, they go in last and cook the least in the hot oil. Of course if they do turn bitter, some simmering in soupy stuff will resolve that problem, so no harm done; but we try to avoid them turning bitter at all.

Step 3: Aromatics

In a few seconds the fenugreek will sizzle as well; now put in and inch of ginger, minced thusly:

toor dal and karela 003

…and 2 green chilies, stems removed, and sliced through (if you have curry leaves, use about 6 of them):

Wait till they sizzle, and the chilies show blisters, then empty the entire thing into the dal.

toor dal and karela 018

Allow the dal to still simmer on for a few minutes for the flavors to meld.

Step 4: Garnish

toor dal and karela 021

Garnish with a handful of chopped cilantro and stir. Have it mixed with rice and perhaps a fried or grilled vegetable on the side.

Efficient butternut-tomato soup

A quick and easy soup that can be done quickly for a weeknight dinner but does not sacrifice flavor at all. This amount of soup was enough for four as a soup course, or for two as dinner.

Step 1: Squash.

butternut squash soup 001

Start with about half a medium butternut squash. Or you could go with pumpkin, but as you can see, I went with butternut. Put some water on the dish and stick it in the microwave for 5 minutes.

Step 2: Deseed and peel.

butternut squash soup 002

The squash comes out softened and partially cooked, as seen above. Cut in half across, it becomes very easy to deseed with a scoop-shaped spoon, as pictured below. As far as the seeds go, I like to chomp on a few of them as they are, the shell and the pith notwithstanding.

butternut squash soup 006

The peel easily pares off with a sharp paring knife. Chop up the flesh into cubes and have it ready to go into the soup.

butternut squash soup 008

Step 3: Aromatics.

I used an inch-long piece of ginger and chopped it into thin strips thusly.

butternut squash soup 004

Now, heat about three tablespoons of extra virgin olive oil in a pot and saute the ginger strips, along with one bay leaf, for a few minutes.

Step 4: Broth and everything else

butternut squash soup 009

Throw in the squash, along with one chopped tomato. I used an orange tomato, not in order to match the squash, but just because that’s all I had. Also put in 3 cups of chicken broth, some salt to taste, and bring to a boil.

Keep it at a healthy simmer for about fifteen minutes.

Step 5: Soupify and correct seasoning.

Now, the soup is ready for its journey through the blender. Pull out the bay leaf first of course! Once smooth, you have the choice to strain it. We did, but used a strainer with rather large holes, to make it easier on ourselves. Return the soup to the pot, and check for salt, and also sweetness. I found the squash I used somewhat lacking in sweetness, and added a few squirts of balsamic vinegar to complement it. Heat it through, mix it, and serve.

butternut soup 2 001

The welcome home salad

synthesis pancakes and welcome home salad 014

What better way to end a trip — come home to a garden with lettuce spilling out of its borders, waiting to be picked. I picked some of the arugula and some frisee and made a giant salad, which was definitely a relief after airport food. The standard dressing I use is the epitome of simple, but there is a technique to it, so file this under ‘basic methods’.

synthesis pancakes and welcome home salad 012

Step 1: Salt

Salt the greens lightly, and toss it around with your fingers. You could use tongs but there is no implement quite as blunt, rubbery, strong, and with as fine control as your fingers.

Step 2: Oil.

Pour some good, green-tinged xtra virgin olive oil around on the greens. How much? Well, just like distance can be measured in light-years, I can tell you the amount of oil in seconds — for a big bowl of greens, squirt oil for around ten seconds. Once again, toss with your fingers. What this step does is coat the greens with the oil, and thereby, the grains of salt are trapped under the sheen of oil, and the seasoning has been captured; and will not easily slip off the greens into a super-seasoned pool in the bottom of the bowl.

Step 3: Vinegar.

I used balsamic. Sprinkle about five seconds (half of the oil) of balsamic vinegar on the greens and toss with your fingers. Considering that the oil is already coating the leaves, the vinegar will bead up on them (oil and vinegar don’t mix), and create little bursts of flavor.

Step 4: Accessorize.

synthesis pancakes and welcome home salad 015

Scoop the greens into bowls and add your choice of toppings. We used one avocado, cubed; and cherry tomatoes, halved. Please do halve them; the juicy insides absorb flavors better than the plastic peel on the outside; and when you’ve got good olive oil and good balsamic, that is a good thing. Place them on the bed of greens.

Hat tip: Nick Stellino, the TV chef.

Stemming the tide of mustard greens

When we first brought our mustard seedlings home, they were petite and unassuming. Planted them in the ground, and given San Francisco’s freakishly warm weather, we soon had curly monsters threatening to swamp the house. Naturally we set about consuming them as fast as we could.

fennel 015

Mustards after a lot of rampaging

Harvested an entire meal’s amount to make Punjab’s famous ‘sarson ka saag’, which means ‘greenish pulpy thing made out of mustard’. It was good, but made not a whit of difference in the amount of curly monsters in the garden.

Soon we were eating sarson ka rice, sarson ka pasta, sarson ka…everything.

On the way, I learnt an important lesson about cooking mustard greens that the Punjabi chefs learnt thousands of years ago. Unless you cook and puree the mustards, the curls in the leaves — which are quite tough, by the way — will interlock and will not separate, and you either get a mouthful of mustards all clumped together, or you get none at all. Pureeing after cooking makes them luscious and even. So here is the basic technique for the Punjabi sarson ka saag, and then my other variations.

Sarson ka saag

Step 1: is the most important:boil and puree.

synthesis pancakes and welcome home salad 004

Mustard greens washed and chopped

Rinse, roughly chop a bunch of mustard greens. Put them in a pot with a quarter cup water, salt, half an onion, roughly chopped, two green chilies, roughly chopped, and a quarter cup chopped cilantro. Bring to a boil, cover, simmer and cook for about fifteen minutes, or until the mustards are no longer bright green. Cool for a few minutes and puree in a blender, although there is no need to make it completely smooth.

Step 2: Seasoning

I couldn’t tell you if every villager in Punjab uses this set of seasonings, but this is what I used, and it was good. I heated two tablespoons of ghee in a small thick bottomed pan on medium-high. Then put in a teaspoon of cumin seeds and 3-4 cloves of garlic, minced. Also half a teaspoon or more of red chili powder. Once they sizzle and the garlic looks cooked (not browned), put in two tablespoons of besan (chickpea flour) and stir. I think the more typical ingredient here is cornmeal so if you have that, use a quarter cup of that instead. Allow the besan (or cornmeal) to roast in the oil for a few minutes. Then empty the seasoning into the mustard puree and stir.

sarson ka saag - mustard greens puree

sarson ka saag

Step 3: Simmer a little longer

Check for salt and add more if needed. Simmer a little longer to meld the flavors and fully cook the besan. Sprinkle some lemon juice over the top (inauthentic ingredient alert). Serve with roti/chapati.

Sarson ka pasta…bucatini with mustard greens

Step 1: boil and puree

Here I boiled the greens with just a quarter onion and some salt. After about fifteen minutes of simmering, I roughly pureed them in a blender. Keep it aside.

Step 2: Seasonings

For the oil, I used about four tablespoons of extra virgin olive oil. Heat it in a large pan on medium. Without waiting for it to heat, put in four large cloves of garlic, minced; three anchovies from a jar; and a few sprinkles of cracked red pepper. The anchovies, as they cook, will melt into the sauce, and add a delicious umami, proteiny flavor. Wait till they sizzle; break up the anchovies with a wooden spoon; then empty the pureed greens into it. Simmer gently, stirring, for a few minutes

Step 3: Pasta

Meanwhile, get a big pot of salted water to boil; once it boils, put in half a pound of bucatini (this is enough for a dinner for two). Wait till it is almost done to al dente, then fish out the pasta with a pasta spoon and put it into the greens along with a few good sized ladles of the pasta water. Use your judgment here — if the greens aren’t saucy enough, add a little more pasta water. Stir nicely to break up the clumps of mustards to combine with the pasta water and turn it into a sauce. Remember the sauce has to coat the pasta, not remain in clumps at the bottom. Stir to cover the pasta with the greens, cover the pot and simmer for just a minute or two. Turn off heat; pour some fresh XVOO on the top, and parmesan shavings if you like, and serve.

This makes a wonderfully light green sauce for the pasta that looks as nutritious as it, in reality, is.

Seeking the heart of fiddlehead ferns

If anyone ever asks me why this blog is called the ‘odd’ pantry — it is named so for vegetables like fiddlehead ferns. When one first encounters them on the grocery shelves one isn’t even really sure what kingdom of life they belong to. They could be worms — no, more like caterpillars — or maggots — curled up. They could be giant microbes, like the spirogyra we learned about in school. They might be seaweed. Have a look:

iPad 064

Are we really supposed to eat that thing?

Fiddlehead ferns are the baby fronds of various types of ferns. They are harvested wild, not cultivated, which explains their rarity on the shelves. But when you happen to see them, grab some, because they are full of fiber, omega-3’s, potassium, and so forth. I believe the fiddleheads one sees in California are the ostrich ferns.

To clean them, soak them in warm water for a few minutes to shake the dirt off, rinse, and do this again. I don’t think you can get all the brown off (at least I wasn’t able to), but not all the brown stuff is dirt. Do snip off the brown tips of the stems.

Having never tried them before, I had to guess about their taste and how to cook them.

First, I tried a method very much like in this recipe. Good, but the fiddleheads don’t seem to char very easily; and, they have a slippery and chunky texture which needed a stronger set of seasonings to stand up to it, I thought.

So second, I tried a different method, which I thought was better.

Step 1:

ipad hijinks 012

Cut them up in about half inch sized lengths.

Step 2: Saute

Heat about 2 tablespoons of oil in a pan on medium high. When it shimmers, put in mustard seeds; wait till they pop, then put in the fiddleheads. Stir. They will go from looking like this:

ipad hijinks 016

to looking like this in a few minutes of medium high sauteing.

ipad hijinks 017

At this point, I threw in some onions. This time I cut them in thin strips, by first halving the onion, giving it one cross cut from root end to stem end, and then slicing it as narrowly as I can. Put them into the pan and stir for a minute.

ipad hijinks 018

Then it is time for half a teaspoon turmeric, red chili powder, and the salt.

ipad hijinks 019

Now the problem with the slippery texture of the fiddleheads is that spices don’t stick to it. So, we need glue in the dish, that the spices will combine with, and that will stick to the ferns. What ingredient is a good glue? Hmm…I used sesame seeds,  ground up, about a third of a cup (super useful to keep a coffee grinder around, just for spices; takes just a minute for jobs of this sort).

Step 3: Braise.

ipad hijinks 020

Stir the sesame seed paste with the fiddleheads, add a half a cup of water, and there — we have the glue that we wanted. One teaspoon of tamarind paste goes in. Stir, cover, simmer on low for about ten minutes, and what we have is this:

ipad hijinks 024

How did it turn out? Well, we had it as one of the sides with roti, for dinner. I thought it was yummy.

But I don’t think my quest for the heart of fiddlehead ferns is over yet. This dish was good but didn’t show off their quintessential fiddlehead-ness. I will be trying other ways to cook them…watch this space.