Malvan’s famous fish: part two, fried fish

fish curry and fried fish and butter tea 035

Malvani fried fish

(Part one is here.)

Quick — name two differences and two similarities between these two kinds of fish: Indian Mackarel (bangda) and Pacific Sand dab.

First the differences:

Mackarel

Mackarel

1. Indian Mackarel swims around in the warm coastal waters around the Arabian Sea off the coast of India. While the Pacific Sand dab inhabits a different coastline altogether — the Pacific, around California, Oregon and Washington.

sanddab

sanddab

2. Another thing — while the mackarel has your basic fish shape, the sand dab is a bottom-hugging, sand-dabbing flat fish. Which means, its one eye migrated creepily over to the same side of its head as the other eye.

Now the similarities, which (to give away the point of this exercise) are far more interesting to me right now.

1. They are similar in size (8 – 9 inches), and found on grocery shelves prepared in a similar way — not as fillets or as a steak, but with the head and tail fins removed, skin on. So they both come with the central ribs intact. That is key.

2. And, because of the above similarity in form factor, both Indian Mackarel and Pacific Sand dab can be used to make the Malvani fried fish recipe!

Ah, what a long-winded way to arrive at the point that I couldn’t find bangda fish, so I substituted with sand dab! Readers of this blog: I have never promised brevity.

On to the main business, if I haven’t lost you already.

Malvan’s famous fried fish, using sand dab instead of mackarel:

Two sand dabs will make a single dinner portion. For two sand dabs, use 3-4 tablespoons of the Malvani fish paste. Also have at hand: some salt, some turmeric powder, and some farina (rava/sooji/cream of wheat).

fish curry and fried fish and butter tea 025 fish curry and fried fish and butter tea 026

Lay each down flat. Carefully cut open at the line of the central ribs bone, as though you are trying to fillet the fish. Open the fish like a book, but do not cut through. You can leave the bone in. Once it is cooked, it will be much easier to pry it out, I promise. Sprinkle salt and turmeric powder on the flesh.

fish curry and fried fish and butter tea 027 fish curry and fried fish and butter tea 030

Now spread a thin layer of the spice paste on both open surfaces of the fish. One of the surfaces will have the bone on it, this is fine, just apply the paste over.

fish curry and fried fish and butter tea 032 fish curry and fried fish and butter tea 033

Close the fish book. Spread paste on both outer surfaces. Now dip both sides in the farina to coat. If you are having trouble keeping the fish book closed, you can tie it closed with some kitchen twine.

Now heat 3 tablespoons of oil in a nonstick pan on high-ish heat. When it shimmers, lay the fish down on one side. Let it shallow-fry for 5 minutes or so, then flip it carefully, still closed, to cook for three minutes or so on the other side. Both sides should be browned when done.

One thing to note about Indian preparations of fish — by Western standards, one would consider them overdone. When fried on both sides, the flesh is quite dry, but it is kept succulent by the moisture in the spice paste. One wants to dry it out a little, because otherwise the spice paste will remain mushy, and one does not want that.

Have it as a side with rice and dal or rotis.

Broiled tomato soup in potato oyster mushroom fond

Broiled tomato soup

Broiled tomato soup

Bright red tomatoes

Bright red tomatoes

So here I am, with bright red tomatoes at the ready, thirsting for some soup. But no chicken broth in the house. Of course one can use water, but I do need to add back in some of that lovely savoriness that a broth would have added.

So I choose a multi-pronged attack.

a) Saute oyster mushrooms into the base. This takes care of the missing umami taste.

b) Brown tiny potato cubes in the base of the pot, to add some of that Maillard goodness.

c) Broil the tomatoes before adding them in to the soup, to add the caramelized flavor of the browned skin.

d) Add some milk/cream at the end to add in the missing protein flavor. Also adds creaminess.

e) Add some Worcestershire sauce, which basically being bottled umami flavor, is a bit of a cheat. The interesting thing here is that one of the ‘natural flavorings’ used in this sauce may be asafetida (heeng), which is used extensively in Indian cooking. And yes, I can vouch for its umami-ness. Among its ingredients is tamarind, also an old stand-by in Indian cooking. I guess those British did pick up a few tidbits about Indian food in the 200-odd years they spent hanging around us.

Oh — and for an aromatic, parsley. Just parsley.

Ingredients:

Handful of chopped parsley

Fistful of chopped oyster mushrooms

One medium potato (new red or purple) chopped into small cubes

Six small tomatoes

Olive oil – some

Salt to taste

Worcestershire sauce – one teaspoon. Substitute with red wine or balsamic vinegar.

Quarter cup milk or cream.

Method:

Heat 2-3 tablespoons of oil in a thick-bottomed pot. Add potato cubes to it and a sprinkle of salt. Saute on medium-high heat for about 10-15 minutes. The potato will start to brown and stick to the bottom of pot for dear life. Let it brown, then dark brown, do not worry. We will deglaze off all that stuck goodness later.

Potatoes browning

Potatoes browning

When it seems that it is on the verge of actually just charring (you do not want that), add in the chopped mushrooms. They will sweat and unstick some of the potato fond. Oh, yes, that is exactly what ‘fond’ means — the foundation or base of a sauce. After a few minutes the mushrooms will have sweated and shrunk. Now add in the minced parsley. Cook, stirring occasionally. You can cover it if you like, to get it to sweat more. Now sprinkle in the Worcestershire sauce, and stir, to deglaze some more.

Minced parsley and chopped oyster mushrooms

Minced parsley and chopped oyster mushrooms

Soup fond nicely browned

Soup fond nicely browned Soup fond nicely browned and water added

Once the mixture looks — I don’t know, kind of soup-base-y, put in a cup and a half of water, bring to a boil, and leave at a very gentle simmer, uncovered.

Halved tomatoes with olive oil

Halved tomatoes with olive oil

Meanwhile, rise and stem the tomatoes. Cut them in half, place face down on an oven-safe dish, and rub olive oil all over them. Broil for 7 minutes or until the skin has wrinkled and charred. Take them out of the oven. You can peel them if you like but I left the peel on. Puree them and toss into the soup.

Broiled tomato halves

Broiled tomato halves

Simmer the soup another ten or twenty minutes, check for salt and blend again if you like it smooth. Add milk and just heat through (do not bring to a boil at this point, because otherwise it will curdle).

IMG_0459[1] IMG_0462[1]

Serve! Possible garnish: shaved parmesan cheese, croutons, parsley, chives. And, I didn’t miss the chicken broth at all.

Bounty for under 25 dollars

Look at all this bounty I got from the Alemany Farmers Market which is is held every Saturday, pretty much all day, in San Francisco.

I love Alemany Farmers Market!Image

Look at what I got: squash blossoms, okra, berries, tiny Thai eggplants, sticky purple corn, oyster mushrooms, purple beans…a bounty of color and phytonutrients!

Taking tea Tibetan style

Tibetan butter tea

Tibetan butter tea

Folks, I thought I knew from tea. I grew up with cups of tea being downed two, three, four times a day, to the point where there there’s almost always a pot of tea going on the stove. Mornings and evenings are centered around tea. Tea and toast, tea and eggs, tea and porridge, tea and chaat, but tea, tea and tea.

There were two types of tea, I thought, the mother’s side kind, and the father’s side kind.

tea cosy

tea cosy

My mother’s side made tea boiled, the Indian way. Loose leaf black, in a pot of water and milk, boil, sugar added to taste, strain into mugs. My father’s side made it the English way because my grandfather had worked with the British in their day. A tray comes to the table, loose leaf black tea steeping in a teapot, covered in a tea cosy. Milk and sugar are in their own pots. Tea is strained into a cup, milk and sugar added to taste. The cup is on a saucer. Always on a saucer.

Cutting chai

Cutting chai

Food stalls big and small, all over the alley ways of India, made tea the mother’s way. Except they had a giant pot going all hours a day in all kinds of weather, and their means of straining is a giant white cloth except it is pretty much brown — a grayish mahogany — from years of straining tea. Not sure when and if it gets washed. The liquid is strained into little glasses: you can order the full, in which case it goes up to the brim. Or you order ‘cutting’, in which case it goes up to under the smooth rim.

In my teenage years I discovered, going to Chinese restaurants with friends, that the Chinese had a different take on tea completely. We could not believe it. Just hot water? No milk, no sugar? But it was…strangely addicting. Those little handle-less cups kept being refilled.

OK, so that’s the gamut, right? Wrong.

So I heard recently from my Nepali friend that Tibetans are tea drinkers too, but given that they live among the mountains, and need strong muscles and layers of fat to protect themselves from the cold, they need a lot of butter; and what better place to put it, than in the interminable cups of tea? That’s right folks, Tibetans like their tea with butter.

That’s not all, they like it salty.

I could not believe that salty, buttery tea existed when I first heard of it; next, I wanted to try it. Try it I did, at my friend’s house. It was luscious and soothing. Next, I wanted to try making it. It took me three tries to make something acceptable, but now I am quite fond of it; and you know what, if you are diabetic or happen to need to climb some mountains on your way to work, this may be just the tea for you.

Tibetan butter tea

This recipe makes just one cup but is easily multiplied. Put one cup of water in a pot with one teaspoon loose leaf black tea. I used orange pekoe Indian tea. Heat it on the stove, but there is no need for it to come to a boil, I found that without any sugar to mask the natural bitterness of tea, I needed it to not develop any bitterness at all. Take it off the heat when it seems as though the water has turned a light reddish brown.

black loose leaf tea steeping

black loose leaf tea steeping

Strain the tea into a blender. In Tibet they use a butter churner that is operated by hand and rather decorative. My blender is nothing to sneeze at but I have to admit it doesn’t compare in sheer beauty to the Tibetan butter churner.

Tibetan tea ingredients in blender

Tibetan tea ingredients in blender

Add 1/8 teaspoon salt, a quarter tablespoon butter, and 2 tablespoons whole milk. In Tibet of course they use yak milk and butter (yak being the male, of course they use the yak’s wife’s milk). I just used the normal cow milk and butter. I have heard though that yak milk is more intense tasting, so if you have access to goat’s milk, you could try using that.

Tibetan tea foamed up in blender

Tibetan tea foamed up in blender

Run the blender for a few minutes till the tea gets very foamy. Pour into a cup and enjoy.

Malvan’s famous fish: part one, the spice paste

Malvan

Malvan

Malvan is a little town on the west coast of India. I have never been to it, nor do I know too much about it; but I can tell you that growing up, our nanny/cook (Bai) was Malvani, and she made the most amazing fish. It still haunts my dreams. The fame of her fried bangda (mackarel) spread among relatives and friends. People who worked two floors away from my mom who saw her once a month in the office canteen would phone her to be reminded of the ingredients.

This was not a quirk of our cook or our family. Malvani fish with its red spice paste is renowned all over the Internet. Don’t believe me? Go ahead, google ‘Malvani’ and come back and tell me what you find. Go ahead, I’ll wait.

Satisfied? When I left for foreign lands one of the heirlooms I carried with me is a scribbled version of this recipe. In this post I will describe the method of making the paste. In two following posts, I will describe how to use it in a couple different fish recipes.

A warning note: family recipes in India are handed around with amounts like a fistful of this, a little bit of that. It is all andaaz se, as it is known. So the amounts here are not handed down from Mount Olympus, but just the proportions that I used for a successful rendition.

Malvani fish masala (spice paste)

This makes about 3/4 cup of the paste which will last in the fridge in an airtight container for some months. The vinegar has a preservative action.

Ingredients (dry spices):

  • 2 large not-hot dry red chilies (Kashmiri, Ancho, Pasilla, or other such)
  • 5 small hot dry red chilies (cayenne)
  • 1 bay leaf
  • 1 cinnamon stick or few small
  • 10 cloves
  • 2 big black cardamom
  • 1 tablespoon white poppy seeds
  • 2 teaspoons fennel
  • 1 teaspoon black pepper seeds

Ingredients (wet spices):

  • 3 large garlic cloves
  • 1 inch piece ginger, peeled
  • 1/4 cup coconut
  • half teaspoon tamarind paste
  • 1/3 cup white vinegar
IMG_1007

Dry spices for Malvani fish masala

The dry spices are to be roasted on a griddle until an aroma starts to arise…but do be careful not to burn them. I did this in stages so I don’t mix the seeds that roast faster with the bigger, slower ones…so do the fennel seeds and the poppy seeds in one batch (they won’t take long) and the rest in the second batch.

Note about why spices are roasted before grinding them: I believe it dries them out a little, makes their skin papery, and easier to grind into a fine powder.

ravioli goan masala 030

Roasted dry spices for Malvani fish masala

Once the dry spices are roasted, wait a few minutes for them to cool and then grind them in a clean coffee grinder.

Now collect the wet spices in a small blender. In goes some ginger, some garlic, half a teaspoon of tamarind paste, a handful of grated coconut. Put in the dry spice powder. To lubricate the blades, add some white vinegar.

ravioli goan masala 035

Wet masala for Malvani fish masala

By the way, Do Not Add Any Water. Malvani Masala not like the H2O. A note about the usage of vinegar: this is not traditional in Indian cooking, but came in by way of the strong Portuguese influence in that region (Goa was colonized by the Portuguese right up until 1960).

Grind it up to a paste, and your red Malvani masala for fish is ready.

ravioli goan masala 036

Masala french toast

french toast and goan masala fish 016

Masala french toast

In India we seem to have a savory correlate for a lot of Western breakfasts. Yes, we have crepes, but we call them dosas and have them with sambhar. Yes we have pancakes, except we call them uttapams and once again dip them in hot chutneys and sambhars. We have our comfort food in cream of wheat (sooji/rawa), except it is cooked with mustard seeds and chilies and onions to make upama.

And of course, we have French Toast, but please stay away from the whipped cream and the sliced bananas and the maple syrup, and instead reach for the chilies and onions — presenting the Masala French Toast. This makes enough  for one serving of brunch.

Step 1: chop the vegetables

Finely chop: half a small onion, half a small tomato, one serrano chili, a fistful of cilantro.

french toast and goan masala fish 006

Masala french toast vegetables

Step 2: combine with eggs

Break two small eggs into a bowl along with the chopped vegetables. Add 3/4 teaspoon salt. Stir with a fork using a beating motion. You could use an egg beater if you like, The eggs will get a little foamy but there is no need to get them completely whipped.

french toast and goan masala fish 008 french toast and goan masala fish 010

Step 3: soak the slices of bread

I used two large slices of white French bread. I generally prefer French bread for this recipe because it has no added sugar (most of the store-bought sliced breads will have added sugar, which clashes with the savoriness of this recipe). Lay them flat on a plate, pour about two-thirds of the egg mixture on. Spread it to cover the slices. The chopped vegetables will cover the slices, that is fine. Soak for a few minutes, turn the slices over, and soak the other side as well. All in all, the slices should soak for about five minutes. Help the egg along onto the dry parts if it is being shy.

french toast and goan masala fish 011

Masala french toast soaking

Step 4: shallow fry

Heat a nonstick pan on medium-high with a teaspoon or two of oil. Spread it around the pan with a spatula. When it shimmers, it is time to lay the soaked slices down: carefully, their structure is probably pretty compromised by egg-soaking by now.

Now one side of each slice will be better soaked than the other (this is what usually happens with me). Lay this side down first, with only a minimal amount of vegetables sticking to it. Our plan is to get this side to crisp up in that wonderfully eggy way, and a thick layer of chopped vegetables will only interfere with the browning.

But the top surface is where the thick layer of chopped vegetables belongs. Once the slices are laid down, pour the rest of the egg mixture on the surface of the slices, spread it around.

french toast and goan masala fish 013

Masala french toast shallow fry

Wait about seven minutes on medium-high heat, and the lower surface will start to brown, crisp up, and will smell quite eggilicious. At this point, carefully flip them over with a spatula. No heroics, just gently lift them up, and lay them down the other side, with the help of a fork. If you try the fancy flipping techniques you will have eggy vegetables strewn all over the stove.

Lower the heat, cook for another few minutes, or just long enough to get the egg to set. Serve!

french toast and goan masala fish 014

Masala french toast flipped over

The Packet Protocol

ravioli goan masala 027

Butternut squash ravioli in sage butter sauce

I apologize for the sinister, Ludlumesque title. Really all I’m talking about is butternut squash ravioli — those pillow-soft — umm, pillows — made of pasta and filled with fillings.

Stuffing things into dough is something that every culture seems to get up to eventually. In India we have parathas and samosas, in China they do the won tons, in Nepal and Tibet they have momos, in Latin America they have the pupusa, and of course we get the ravioli from Italy (just one of their many filled pastas).

Butternut squash ravioli has been my husband’s favorite for years. He would always order it at Italian restaurants if it was available on the menu; that didn’t happen often enough, so we found a source of made raviolis at Rainbow Grocery and farmers markets. That source was not consistent either, so he coaxed me into getting out my pasta machine out from storage to attempt making it at home. The dough of course, is the same for any pasta shapes you might want to make; the recipe for the filling and the procedure follows.

One thing to note is that this is a vegan filling, which is somewhat unusual. We have always sought out vegan fillings (not because we don’t eat dairy, we do) but because most fillings seem to be so full of cheese and creaminess that one can hardly taste the actual flavor of the stuff. This one is chock full of butternut squash flavor.

Butternut squash ravioli with sage butter sauce: Ingredients:

Half a recipe of pasta dough from “It’s nice to be kneaded“, made into sheets

Half a regular-sized butternut squash

A teaspoon of olive oil

Salt to tast

Two tablespoons butter

Some slivered almonds

5-6 leaves of sage, chopped

Butternut squash ravioli with sage butter sauce: method:

ravioli goan masala 016

preparing the squash

Cut the squash into halves lengthwise. Place it face-down on a plate, with a few tablespoons of water, and stick it in the microwave for 8 minutes or until done. Test it with a knife — it should as soft as butter. When it cools a little, it should be easy to scoop out the seeds to discard, and the flesh to save in a bowl.

Mix in some salt and the olive oil, and whisk them in, which should have the effect of making the filling more luscious. Filling is done.

ravioli goan masala 017 ravioli goan masala 018

Now we construct the ravioli. Find two sheets of pasta that are roughly even in size. Lay out one (after dusting the surface with flour). Then place the filling in dots along the sheet, a teaspoon each, while leaving a lot of space around to stitch up the pillow seams, so to speak.  Using some water to dip your finger in, carefully moisten the gaps in between the filling rounds.

ravioli goan masala 019 ravioli goan masala 020 ravioli goan masala 021 ravioli goan masala 022

The other sheet of pasta gets laid carefully over to cover. Press down gently but firmly to stick to its brother sheet on the bottom, along the channels that you dampened with water. Try to squeeze out any air from the pocket. Now, using a pizza cutter if you have one, or a butter knife if you don’t, cut the ravioli into squares along the pillow seams. Keep dusting with flour as you remove the prepared squares to a plate.

If you have some weird shapes left, don’t throw them away, I at any rate wrap filling into the scraps and fold over like a won ton, or find a few misshapen scraps to combine into a plausible ravioli.

These are ready, now to cook them and the sauce. Set a big pot of water to boil with a teaspoon of salt. While that is coming to a boil, prepare the very simple sauce in a wide pan. Heat up the butter; in it, gently saute the sage leaves and the slivered almonds. Let it simmer very gently.

sage butter sauce

sage butter sauce

Once the water comes to a rolling boil, put in the raviolis (do not toss them in, or the hot water will toss back at you). They only need to cook for a few minutes, and you will know when they are done when they float up to the top. Remove them with a slotted spoon into the sauce, and add a few ladles of the pasta cooking water to make the sauce flowing. Stir, simmer additionally for a few minutes with the cover on, and they are ready.

ravioli goan masala 026

ravioli in sage butter sauce

It’s nice to be kneaded

There are a lot of kids who will eat nothing but pasta. Imagine if they helped you manufacture the pasta themselves, watched the strands appear, then saw those same strands on their plates for dinner? Wouldn’t they feel special, knowing that their own little hands created their dinner? Wouldn’t they feel — I don’t know — needed?

Well pasta dough relishes some kneading too. So let’s get to it.

You might have heard of semolina flour. It is yellower than the flour used for bread, and coarser. This is the official flour used for making pasta. What is so special about it that makes it suitable for pasta, where the regular bread wheat is not?

Durum Wheat Grain crop 041

Durum wheat image from Purcell Mountain farms

Semolina is made out of durum wheat, a different species than bread wheat. This one has a somewhat different gluten. It is very strong (stronger than bread wheat) but not as elastic. When I first heard that it was a revelation to me. One can see that in the substance of pasta itself. It can definitely hold its shape, but doesn’t expand — can you imagine a spongy spaghetti filled with air bubbles? I can’t. There’s your durum. Strong gluten, but not elastic.

Much as I would love it if it were so, semolina is not whole grain. In fact the word ‘semolina’ describes a certain kind of grind of wheat:

– it is coarse,

– it doesn’t include the bran (the fibrous outer covering, think egg shell)

– it doesn’t include the germ (the new baby wheat plant in utero, think egg yolk)

– it is entirely composed of endosperm, which in any seed is the starchy part that would form the food of the new plant, if it were to germinate (think egg white).

pasta machine 002

pasta machine

Although you could make pasta with a simple rolling pin, it is so much easier, if you are in the mood to splurge, to go buy a hand-cranked pasta machine. Plus that means a kid can crank the handle, feed the dough in, choose shapes, and have a great time. My kid certainly did and she doesn’t even like pasta.

Homemade pasta — the dough:

Put in a bowl: one and three-quarters cup semolina flour for four dinner portions; half a teaspoon salt, and stir with a fork. Make a well in the center and break three eggs into it.

ravioli goan masala 007

Semolina with eggs

Stir the eggs to break the yolks, and gradually start pulling in the dry semolina. When the middle part of the semolina is more or less moistened, and quite wet, it is time to use your fingers and upper body strength. You might want to put the dough out onto the counter as well.

ravioli goan masala 008 ravioli goan masala 011

This dough comes together relatively easily. Could it be the strong gluten? Keep pushing the dry bits into the center of the dough to integrate them; if you need to add a few drops of olive oil to add moisture, you can; or add a spoon or two of extra dry flour if too sticky. The dough should be integrated, smooth, and only a little tacky.

Leave it aside for about half an hour, covered.

Homemade pasta — the sheets or shapes:

Divide up the dough into even sized pieces. Flatten each piece and send it through the pasta machine while cranking it. You will start with size 1 (where the rollers are at their widest). What comes out will be a thick sheet approximately rectangular in shape. Send it through again with the next size up: 2.

ravioli goan masala 013 ravioli goan masala 014

Sometimes you will see that the sheet comes out with a few rips in it. My guess is that the gluten wasn’t developed enough. Perhaps not enough kneading, or not enough waiting after kneading. This happened to me, but I solved it by folding over one of the rectangles two or three times, and then sending it through, thus kneading again, by means of the pasta machine.

Get it as thin as you like, I went up to size 5 and thought that was enough. Most machines come with some shapes too for you to experiment with. I did plain rectangular sheets to make raviolis with below:

ravioli goan masala 015

pasta sheets for ravioli

Oh — and dust with dry flour once in a while, so the sheets or noodles don’t stick together!

Hot stuff – ginger chutney

adrak chutney 016

I hope you are clutching your socks, Dear Reader, because this recipe is going to Knock Them Off. It combines the heat of chilies with the singe of ginger, spiked with garlic. Just when you think you’ve been slapped around enough, in comes the soothing savoriness of lentils, and then you get your sweet reward.

I thought I was familiar with South Indian food, having grown up in cosmopolitan Bombay. But every once in a while I hear of a preparation that reminds me that restaurant cuisine (for any regional food) is rather more limited than what families actually eat. Restaurant cuisine is a cartoon representation of the reality that plays out in home kitchens.

South Indian food is culturally quite different from North Indian. There is a heavier reliance on rice than on wheat, for one. Then there’s the prevalence of coconut. But the one thing that really interests me (and one that I’ve used in quite diverse recipes, like on salmon — details later) — is that some lentils are used as a spice.

The main one is urad dal (Vigna mungo). This is known as ‘black lentil’ when it is whole, and ‘white lentil’ when it has been split and skin removed. This bean is native to India and one of those stealth ingredients that appears in various forms all over the country — maa ki dal in Punjab, dahi vada all over the north, a third of the grain content for dosas and idlis, and in innumerable recipes as a sprinkling in hot oil as a spice. When used as a spice, it does not add heat, but a sort of sharp savoriness and crunch. Imagine a quieter peanut. It is hard to describe.

But the star of this show is ginger, another tropical beauty. So let us proceed with ginger chutney. I got this recipe from my friend Rama who hails from South India. She will vouch for its authenticity and I vouch for hers.

Ingredients:

2 inch piece of ginger

2 cloves garlic

1 tablespoon urad dal (split and skinned)

1.5 tablespoon channa dal (bengal gram)

4 – 5 dry red chilies, or adjust to your heat preference

half a teaspoon tamarind paste (I use the paste that comes in a jar rather than the pods) — or substitute lime juice

half an inch square of jaggery — substitute with sugar

salt to taste

Method:

Mince the ginger and garlic. Their relative proportion are shown here:

adrak chutney 003

Ginger chutney: ginger and garlic

Also have the dals and dry red chilies ready to go, and their relative proportion is shown here:

adrak chutney 004

Ginger chutney: dals and red chilies

Warm a small, thick-bottomed pan with a teaspoon of oil. When the oil shimmers, put in the dals, first. Stir for around 5 minutes on high-ish heat, until they smell roasty and get reddened. They will turn color into something like this:

adrak chutney 007

Ginger chutney: roasted dals

Remove them to a vessel while draining the oil, and in the same oil, roast the dry red chilies. In a few seconds they will swell and in several more seconds they will darken. Turn the hood on if you have one or open windows, or you will pay for it by coughing. Remove the chilies once they darken. The spices to be dry-ground are done.

adrak chutney 010

Ginger chutney: dry spices

Now in the remaining oil, add the ginger and garlic. Add a drop more oil if needed, to moisten them completely. Stir on medium heat until they look shrunken and cooked (not brown). Like so:

adrak chutney 011

Ginger chutney: ginger garlic

At this point, I put the jaggery into the hot oil along with the ginger and garlic, to get some of that caramel flavor going. The heat, and the pressing with wooden spoon, got the jaggery melted and combined with the ginger and garlic, like so:

adrak chutney 013

Ginger chutney: ginger, garlic, jaggery

Turn of the flame, and now the grinding starts. First the dry spices are ground separately in a coffee grinder to produce a coarse powder:

adrak chutney 014

Ginger chutney: dry spices

Now for the blender step. Pour the dry spices, the ginger and garlic, the half teaspoon of tamarind, some salt to taste, and some water to lubricate the blades. Blend for about 3-4 minutes to get a smooth paste:

adrak chutney 015

There, you have your ginger chutney, ready to eat with idlis or dosas. Those are just the traditional accompaniments, but this chutney could add a lot to a sandwich with roasted vegetables, or a felafel wrap, or spread on baked chicken.

Update on 3/28/14: So months after posting this, I’m entering this in this month’s Spice Trail contest which is about ginger, hosted by Vanesther at the Bangers and Mash blog:

http://bangermashchat.wordpress.com/

Go thou and explore!

How bread can teach you patience

Yeast makes bread rise, but lesser yeast makes better bread. Bread made with a quarter teaspoon yeast develops more flavor than a good heaping helping of two teaspoons. So why would anyone ever add more yeast? Well, you pay for it with time.

If you mix your dough, forget about it for a few hours; or leave it out overnight or stick it in the fridge for a day — if that process doesn’t drive you crazy — you draw more flavor out of the wheat. Take a deep breath, forget about it, and wait.

So when I saw a recipe from King Arthur that emphasized the minimal amount of yeast, I figured I would try it. It had a couple more qualities that I look for in bread.

  1. Half the flour is whole wheat. You get all the fiber from the bran and all the nutrients from the germ. I’m sold.
  2. This is an artisan bread, which I prefer, not an enriched loaf. What’s the difference, you ask? Both are yeasted breads, but quite different animals. Here are the differences.
  • artisan breads are free-form, while enriched breads are usually made in loaf pans to get that characteristic (some might say cartoonish?) square bread shape with wings at top
  • artisan breads have a strong crust and holes inside, while enriched breads are softer with an even texture throughout
  • artisan breads tend to emphasize just the taste of the wheat and often have just flour, water, yeast and salt as the ingredients. While enriched breads are — you know, enriched — with sugar, dairy, fat, raisins, cinnamon, cheddar, what have you
  • artisan breads are cooked faster and hotter, while enriched breads are cooked for longer at a more gentle oven temperature
  • artisan breads are good for tearing off bits to have with butter or olive oil, while the raison d’etre of enriched breads is toast and sandwiches.

Artisan loaves are somewhat fetishized (one could argue I’m fetishizing them right now); so it is rare to find a whole wheat artisan bread because the bran detracts from the holey chewiness somewhat. This recipe is a find.

The recipe makes two loaves.

Whole wheat artisanal loaves based on King Arthur’s recipe

Step 1: Make the sponge

whole wheat artisanal loaf 001

Whole wheat loaf: mixing the sponge

One cup whole wheat flour (I used King Arthur’s premium whole wheat), 1/16 teaspoon instant yeast (basically, a pinch), half cup water. Stir with a whisking motion, my favorite implement for this is a chopstick. You might have to use your fingers at the end. The point is not to knead it, just combine it into a very sticky mixture. Leave this on the countertop overnight or all day, covered with plastic wrap.

whole wheat artisanal loaf 002

Whole wheat loaf: sponge

whole wheat artisanal loaf 003

Whole wheat loaf: sponge ready to rise

whole wheat artisanal loaf 005

Whole wheat loaf: sponge after it has risen

Step 2: Make the dough

By next morning the sponge will have expanded; if you touch it lightly with your fingertip it will press in easily just like a — like a baby’s cheek. Now mix the dough.

Mix the dry stuff first:

2 1/4 cup bread flour (substitute with all purpose; this is not the whole grain)

1 1/4 cup whole wheat flour

1/4 teaspoon yeast

1 1/2 salt

Put the dry flours into the bowl of a mixer if you are using one, otherwise a large bowl. Stir the dry stuff together with a fork. Try not to let the salt come in contact with the yeast, because it kills it. The way to do that is stir the yeast in with the flour first, then sprinkle the salt on, and stir that in next.

Now break the sponge from Step 1 into walnut-sized bits and throw into the dry stuff. Once in a while stir to cover the wet sponge with the dry flour.

whole wheat artisanal loaf 010

Whole wheat loaf: breaking the sponge into bits

Now put in 1 cup + 3 tbsp filtered water (not tap water since it is chlorinated). Start the mixer on the slowest speed for just a minute until all the water is combined with the flour and forms a shaggy mass. If it looks like there is dry flour at the bottom that simply will not get combined, you can help it along with a spatula; or if they still can’t find enough water, give them a spoon or two, the poor babies.

whole wheat loaf: a shaggy mass

whole wheat loaf: a shaggy mass

Now cover with plastic wrap and leave it be for 10 minutes. This process is called autolysis, which gets the dough to start the process of building gluten on its own, in the presence off water, without you doing a thing.  Except waiting. I told you this was all about waiting.

This recipe for chapati/roti, even though it is about a flat bread, has some explanation of the process of building gluten.

Now, the kneading will proceed a lot faster. Turn on the mixer on slow speed for about 5 minutes.

whole wheat artisanal loaf 016

Whole wheat loaf: done with mixer

Pull out the dough, and finish the process by hand on a counter top. You now have a smooth dough. Put it into an oiled container, cover the dough with oil inside and out, and mark the level to which the dough comes up to.

Whole wheat loaf: a smooth dough

Whole wheat loaf: a smooth dough

At this point you will be waiting for 3 – 4 hours; if this doesn’t fit your schedule and you want to wait longer, use the fridge.

whole wheat artisanal loaf 019

Step 3: Folding once in a while

While the bread is rising, give it some folds while handling it gently (don’t pound at it). The first time after an hour of rising, the second time another hour later, or skipping it is fine too. This is how you fold the bread — that I learnt from Rose Levy Berenbaum’s book The Bread Bible. Drag the dough out and flatten it into a rectangle. Fold both ends in one on top of the other as though you are trying to wrap a present. Flatten it out gently, give it one quarter turn, stretch it out widthwise, and give it another fold.

whole wheat artisanal loaf 020 whole wheat artisanal loaf 022 whole wheat artisanal loaf 023 whole wheat artisanal loaf 024

Put the dough back in its container. Allow it to rise until it is at least doubled, which you can tell from the line you drew to mark its level. When it is fully risen it will be very puffy with air and you might even see bubbles at the surface. Look carefully at the picture on the right below — you can see bubbles enveloped in a thin stretch of dough.

whole wheat artisanal loaf 027 whole wheat artisanal loaf 028

Step 4: Shaping

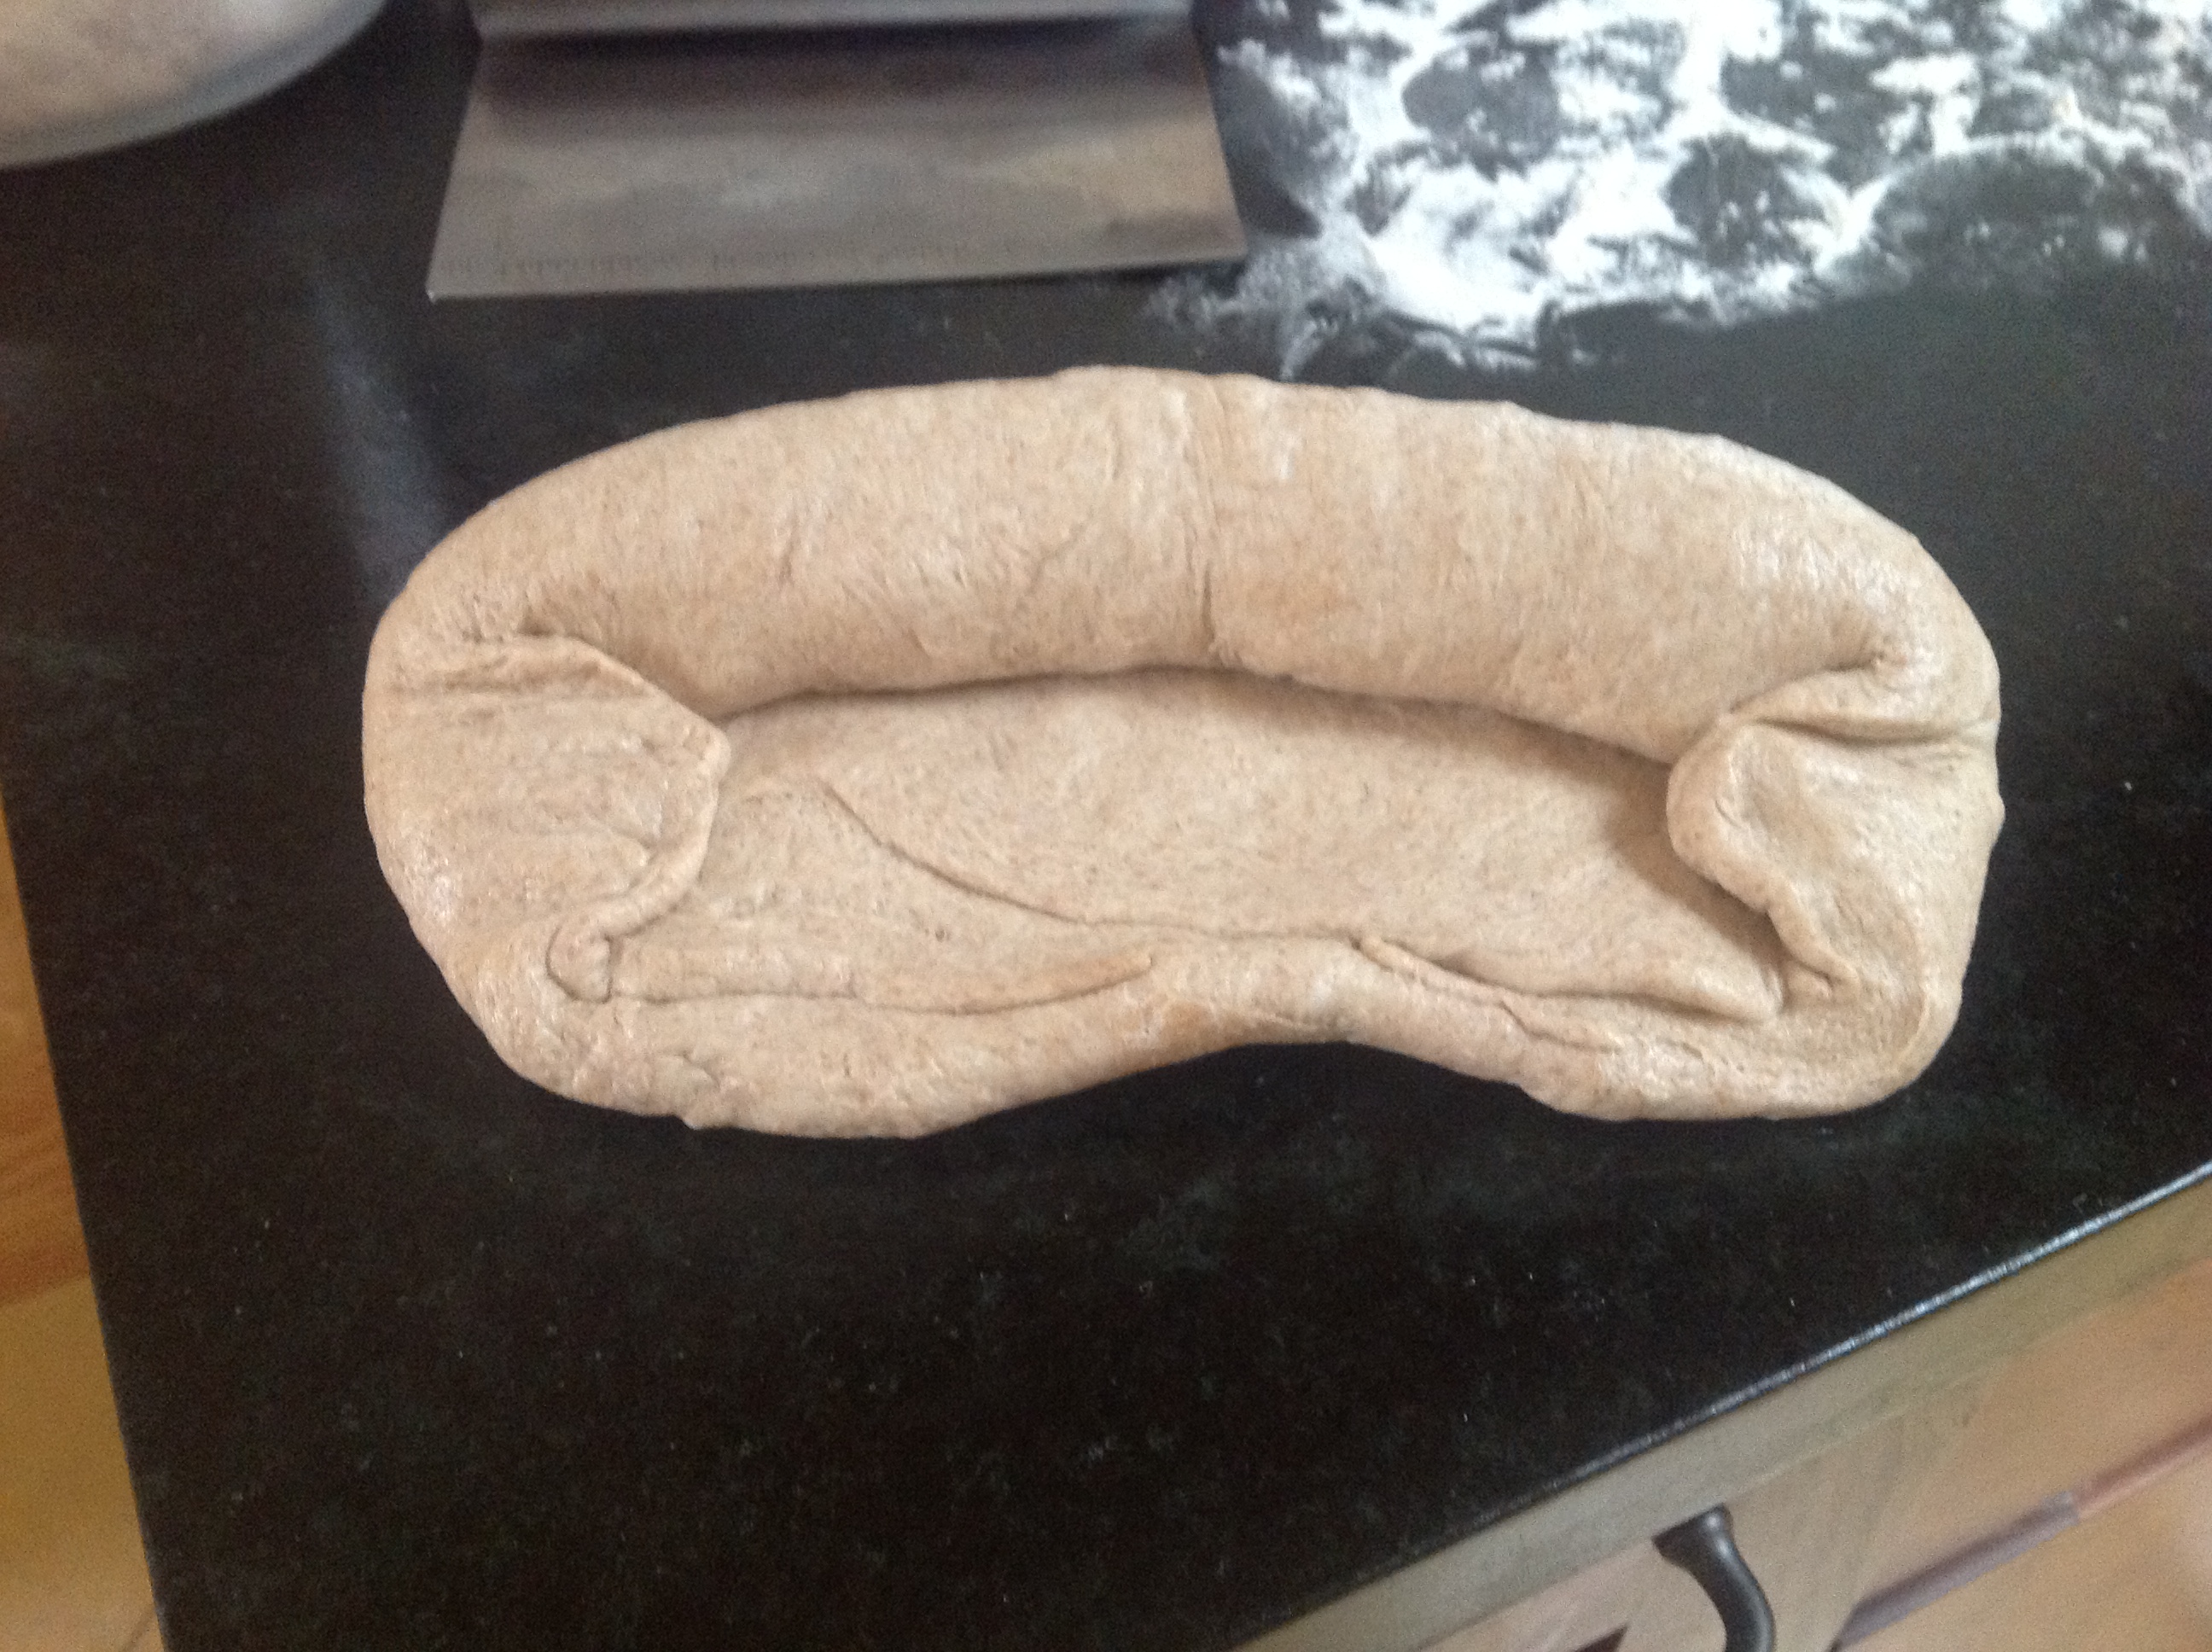
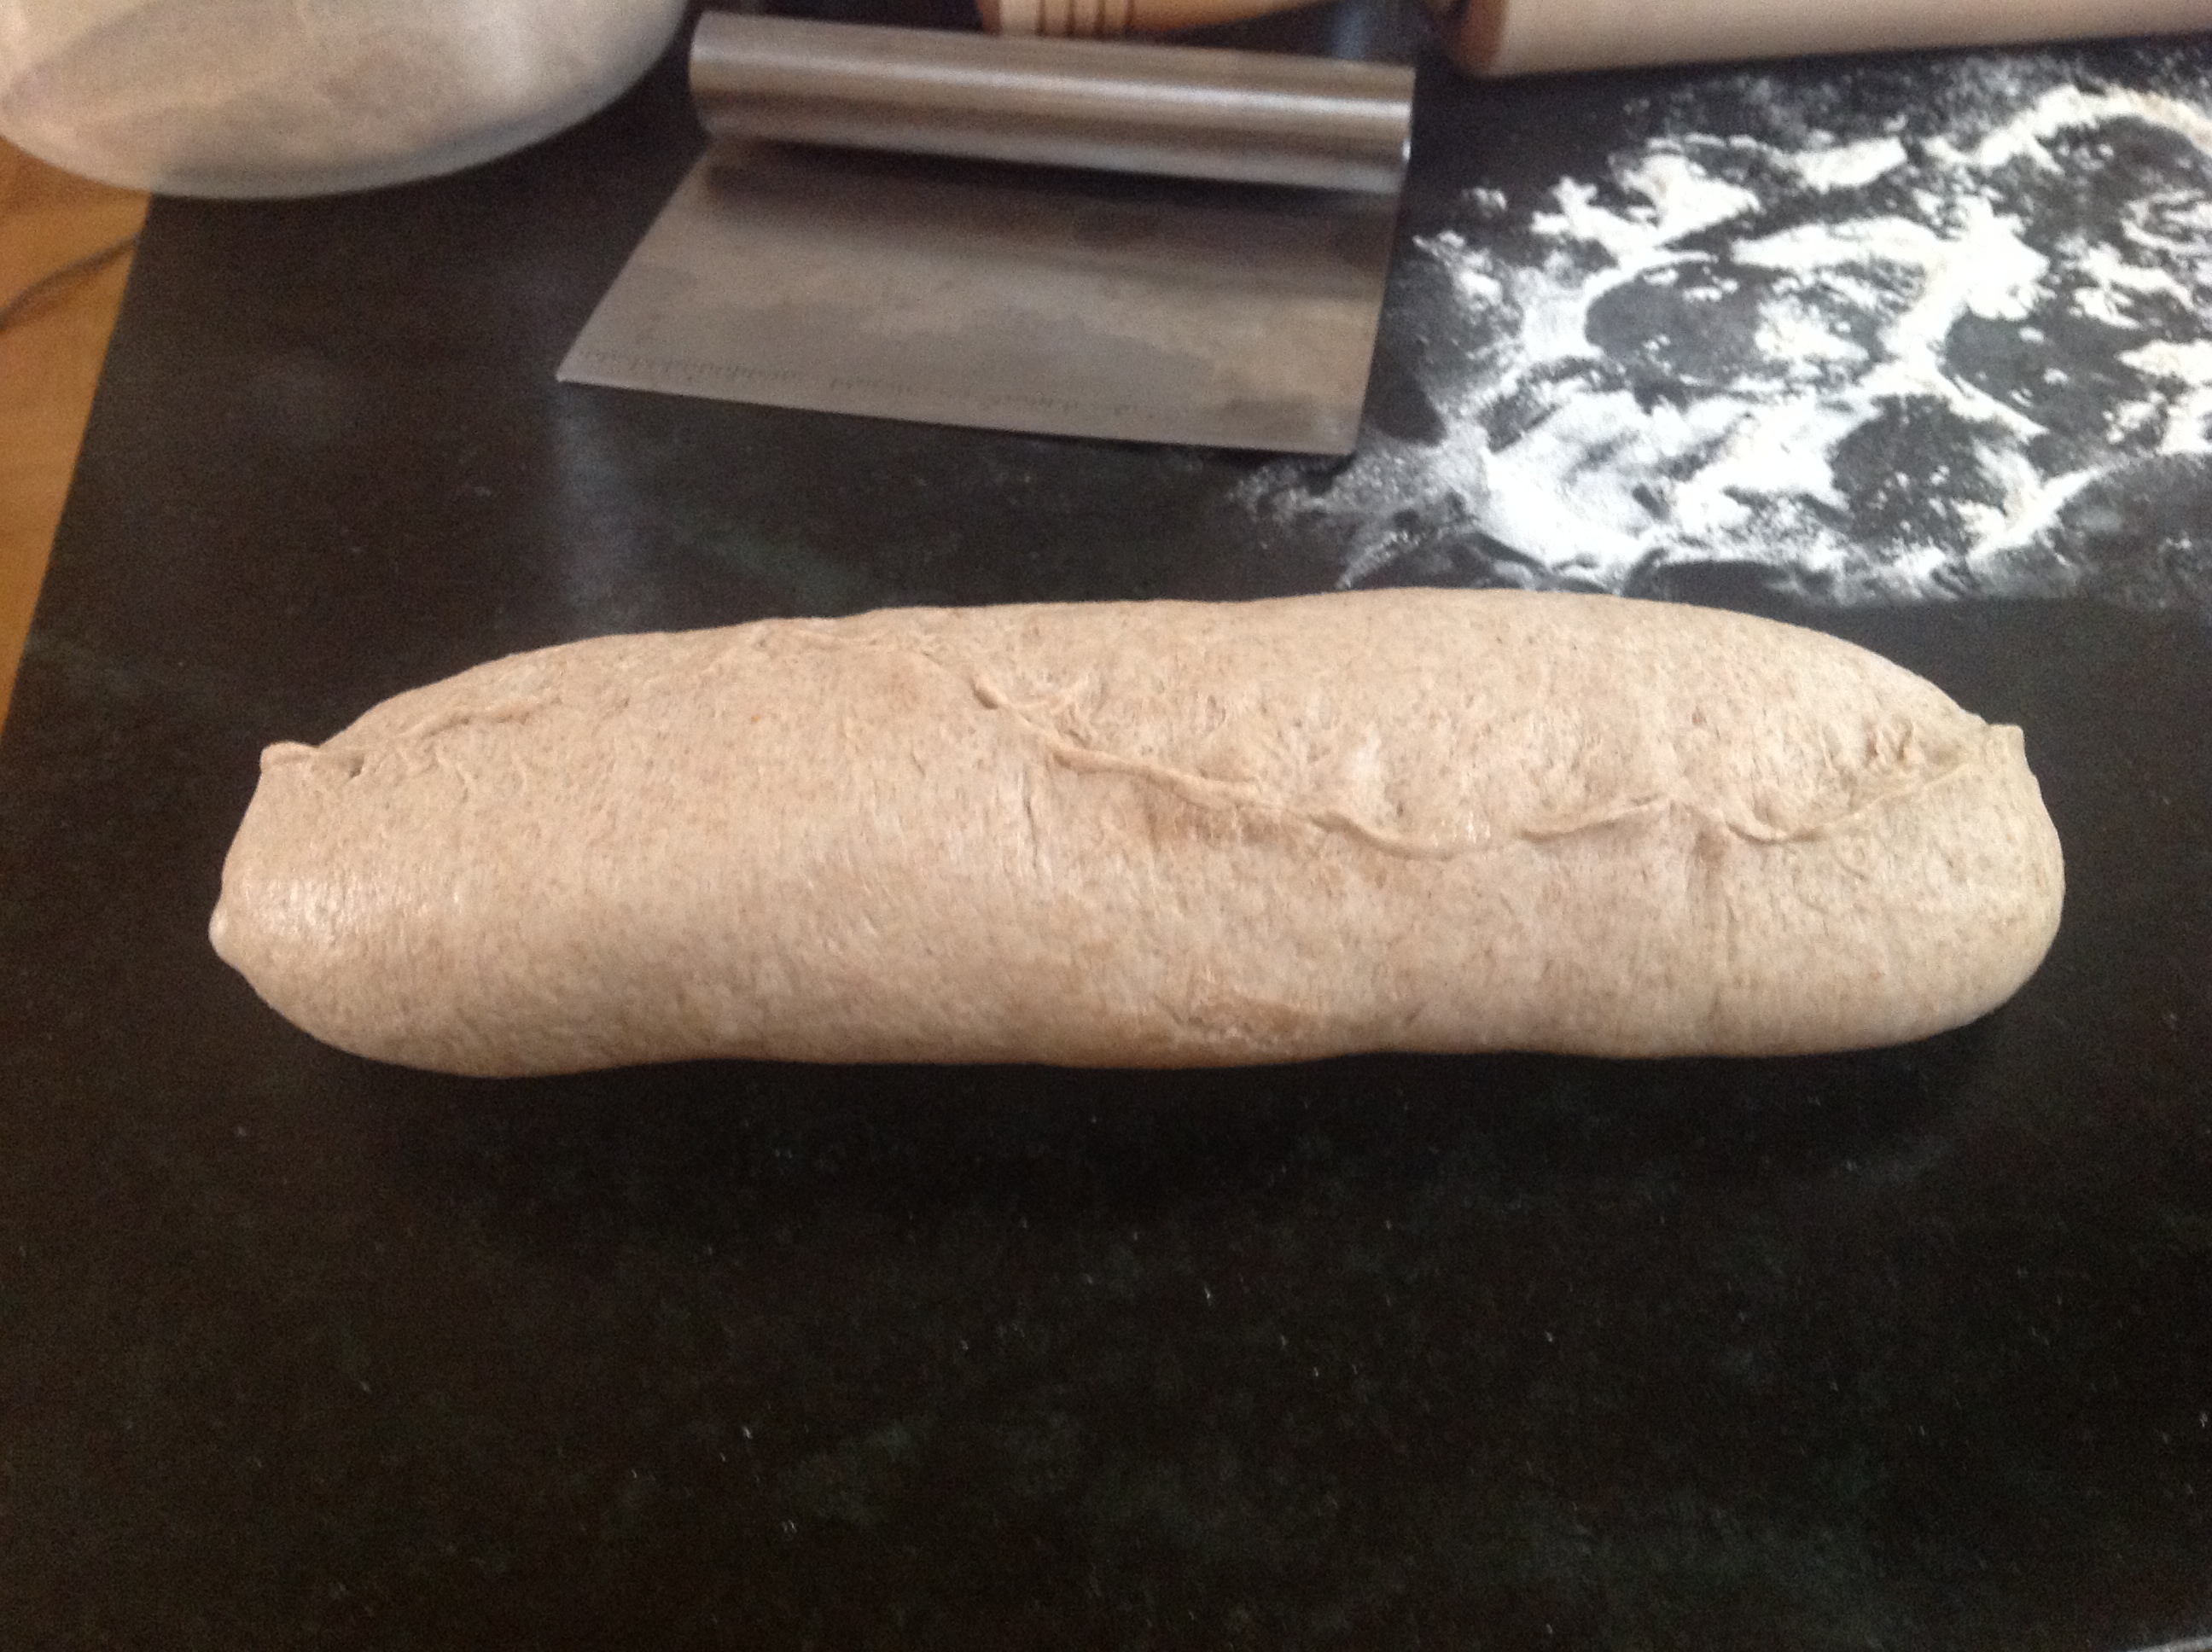
At this point you are ready to shape the dough into loaves. Pull the dough out gently, lay it on the counter, and cut it into two. Each half will be shaped separately. The idea with shaping is you flatten the dough out and start rolling it width-wise, quite tightly, while firmly tucking in all ends. At the end you will have a cylindrical roll. Pinch the seams closed. When you think of bread rising, the easiest way to think of it is that you are stretching the dough at the surface to increase surface tension and make a sort of balloon — a gluten balloon — that will trap the air in as the yeast breathes out CO2.

whole wheat artisanal loaf 030 whole wheat artisanal loaf 034whole wheat artisanal loaf 032 whole wheat artisanal loaf 033

Dust the loaves with some dry flour, place them on a parchment paper on a cookie sheet to rise. Cover with plastic wrap so that the surface does not dry out.

whole wheat artisanal loaf 038

Whole wheat loaves: final rise

At this point wait 1.5 hours until the loaves have expanded 1.5 times.

Step 5: Scoring

Preheat the oven at 475 F. Before putting the loaves into the oven one has to score them, which means make half inch deep cuts on the surface. Once it starts baking in the oven the rapid expansion of steam inside the dough is going to make the bread rise so much that it wants to explode (the gluten balloon will want to pop). The cuts guide the ‘explosion’ to happen along those channels instead of an untidy way anywhere along the loaf (usually along the seams).

whole wheat artisanal loaf 042 whole wheat artisanal loaf 041

So take a sharp, serrated knife, and make swift, slicing cuts along the top surface with a very gentle motion. Half inch deep at least. Now mist the loaves with water from a spray bottle, and they are ready to pop into the oven.

Step 6: Baking

The oven at this point is very hot (475 F, and if you have a pizza stone stick it in there as well). We are going to circulate the heat around so it penetrates the loaves as fast as possible using steam. During the first 10 minutes, mist the loaves to create steam: open the oven door very briefly and spray water around inside. Mist it a few times — three or four times — during the first 10 minutes of baking.

Now lower the temperature to 400 F, and bake for an additional 25 minutes. Take the bread out and let them cool for an hour before slicing.

whole wheat artisanal loaf 046

Whole wheat artisanal loaf

The crumb of this bread was quite nice with a few small holes.

whole wheat artisanal loaf 052

Remember I said above that the explosion in the oven will want to happen along the seam, and you want to avoid that? I wasn’t able to avoid that completely, witness the explosion along the side below.

whole wheat artisanal loaf 048

Well I sliced right into that explosion and the whole thing was delicious anyway.