Taro the terrible escapes again

Taro chaat

Taro chaat

…with some excellent results. I have before made note of taro root‘s scruffy appearance and its delectable nature. In this appetizer from my Sindhi childhood, taro shines with a few well-chosen accompaniments. This dish can go as a side with any Indian meal, or have it in the evening during a chaat and tea session.

Taro chaat

Ingredients:

  • 2 or so medium-sized taro tubers
  • 4 tablespoons tamarind chutney
  • 1 tablespoon finely chopped onion
  • 1 tablespoon minced cilantro leaves
  • Quarter teaspoon salt
  • Quarter teaspoon red chili powder
  • Half a teaspoon cumin seeds

Method

Rinse the taro and microwave it for about 5 minutes. Now it will be softened inside. When it cools, peel it to reveal the creamy white flesh. Cube it into quarter-inch wide cubes and save in a bowl.

Put in the cilantro and onion. And one is supposed to ‘layer the salt’ so go ahead, add enough salt for this amount of ingredients and stir. This will be about a quarter of a teaspoon but use your judgment.

IMG_0805

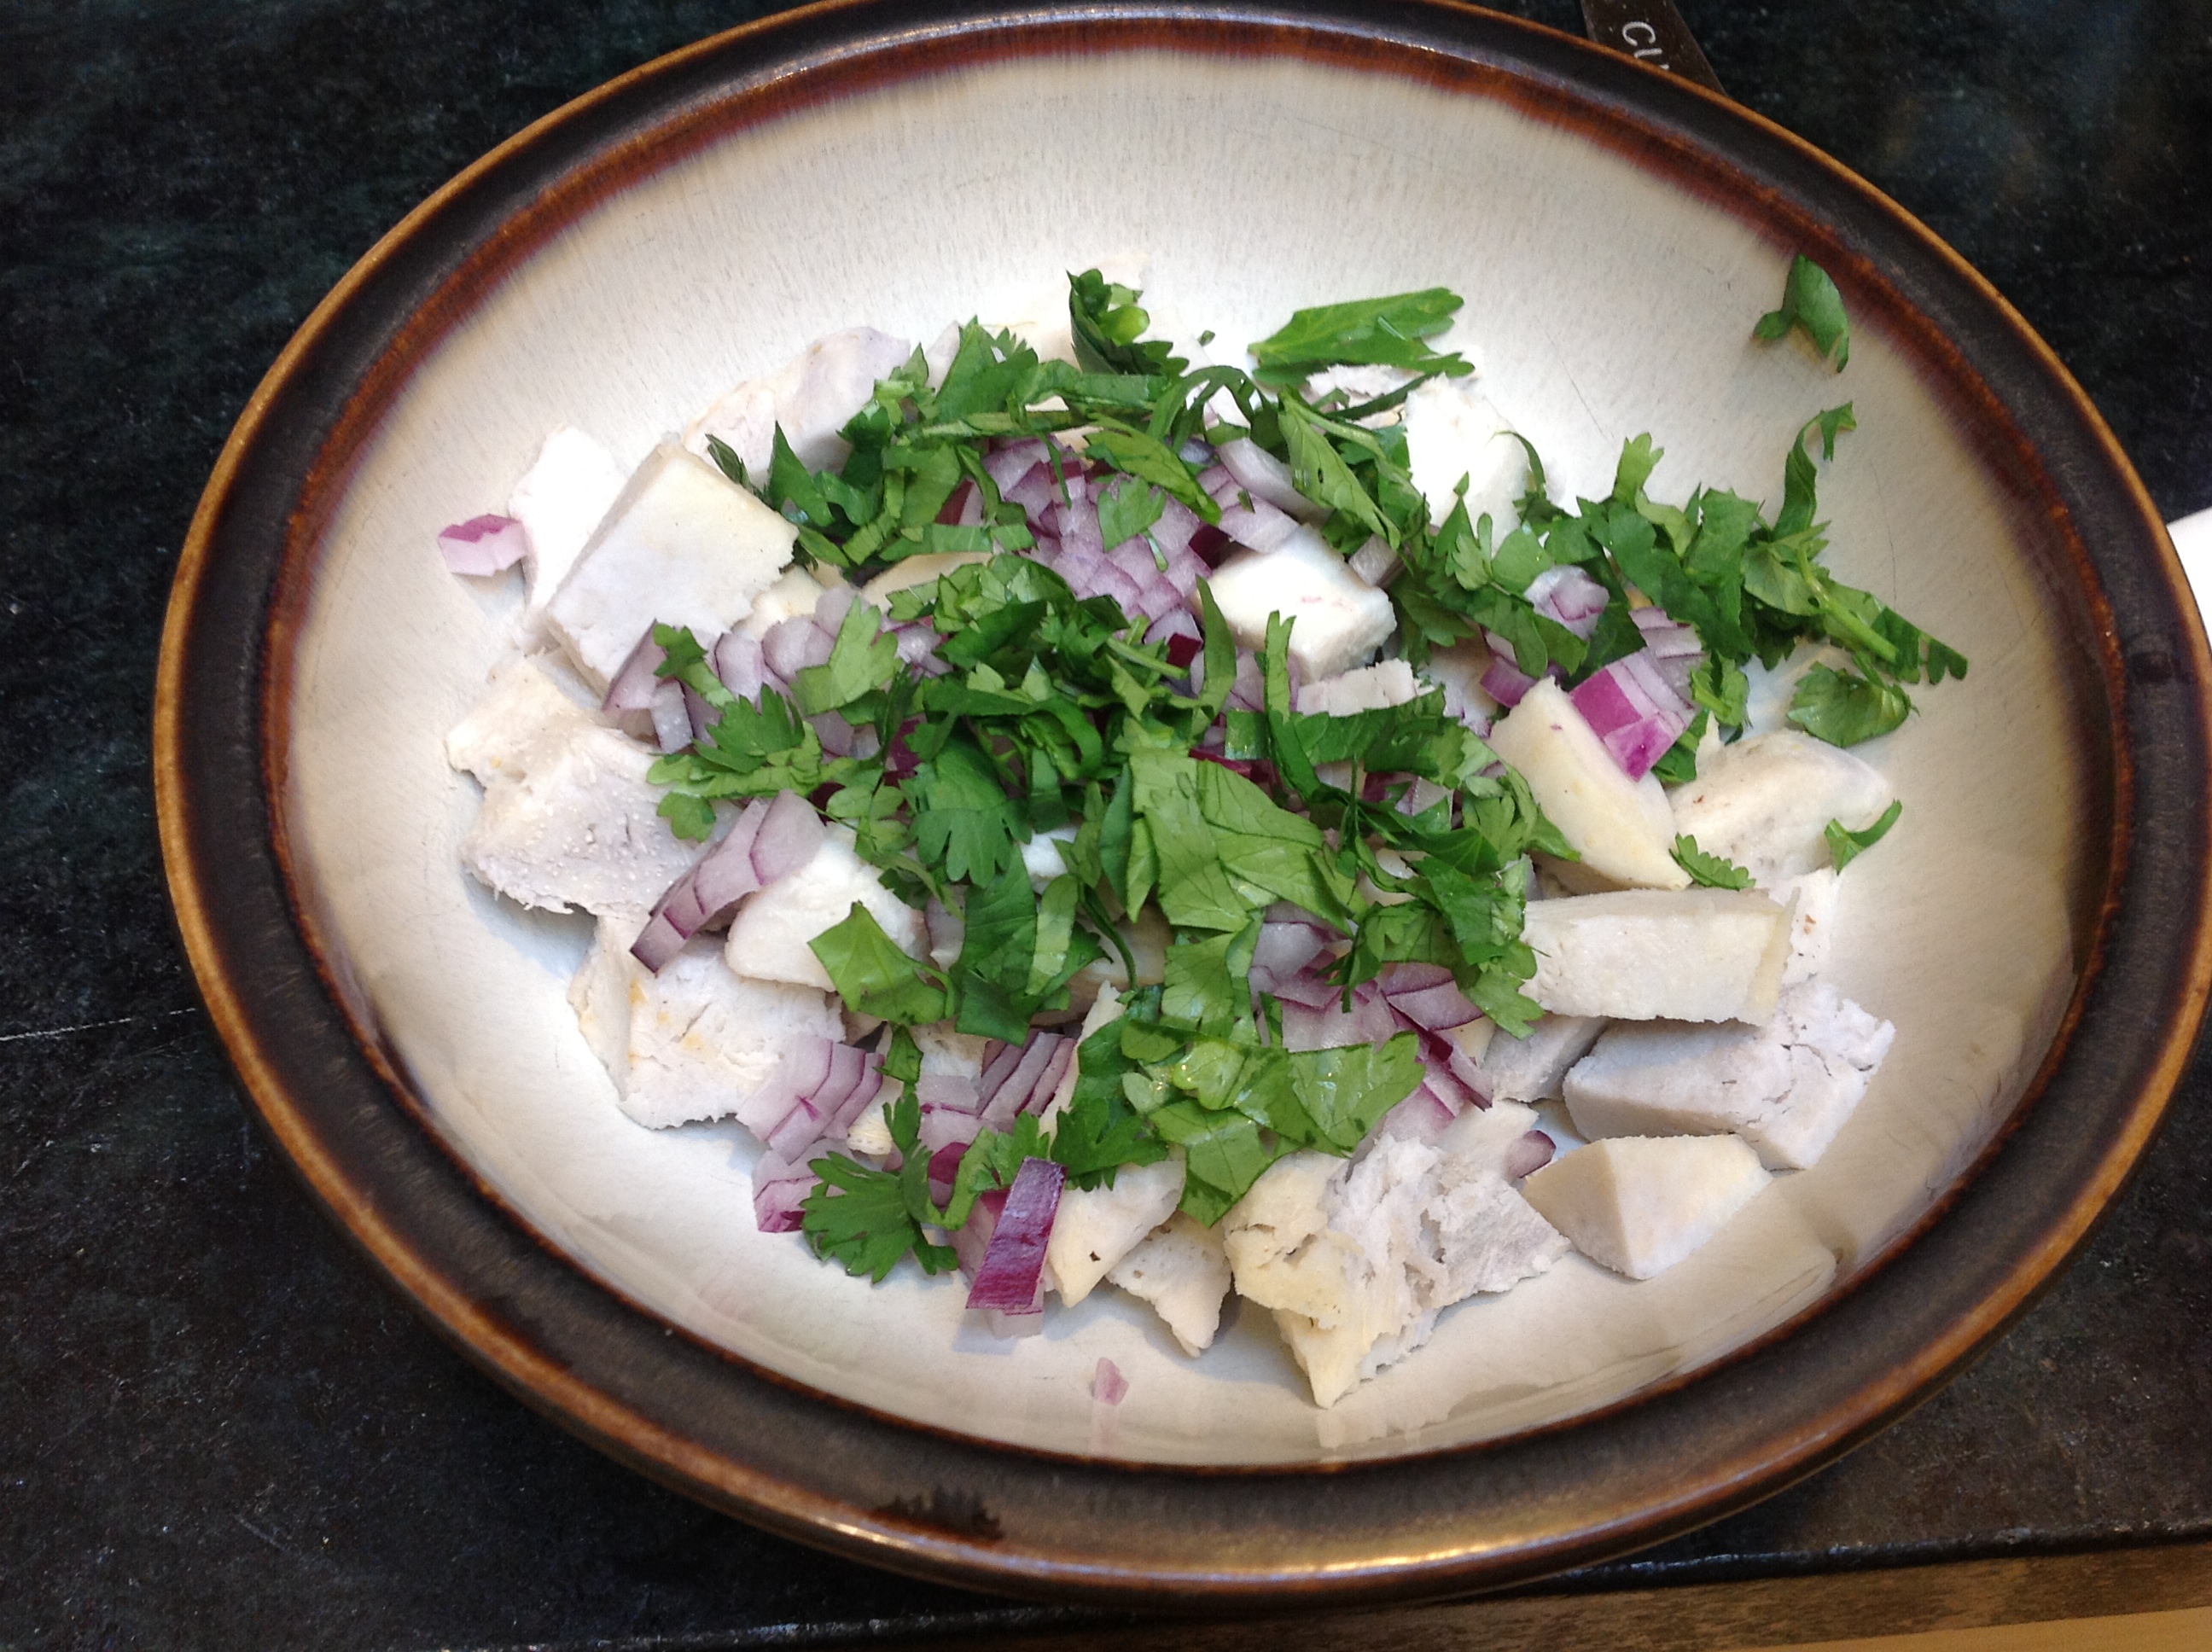
Now put in the prepared tamarind chutney. Now. A slight digression about tamarind chutney is forthcoming.

You can make tamarind chutney the easy or hard way. The hard way uses the dried pods of tamarind, either peeled and made into a block, or the pods themselves. Either way this method requires a lot of soaking and squeezing with your fingers to get the pulp out. So I tend to use a shortcut method — tamarind paste is the one thing I do buy prepared from the store. I use tamarind paste, and this is a good recipe for tamarind chutney using the paste. If you want, you can add a couple dried dates, chopped fine.

Roast the cumin seeds in a hot, dry pan for a minute or two, till they turn a shade darker, and grind to a rough powder in a clean coffee grinder or a mortar and pestle.

Top the tamarind with the red chili powder, and the cumin powder, stir well, and you are done.

This makes enough for one person as a largish side, but is easily multiplied. Oh — and if you don’t possess tamarind or have a special hatred for it, you could substitute with a similar amount of lime juice.

The doofus

Somebody stop me I feel a thesis coming on. It is about this vegetable:

Kaddoo

Kaddoo

This is not the kind of vegetable that one expects paens to be written about. It is found anywhere that vegetables are sold in India; and being India, that could be a basket at a railway platform or a sheet laid out on the sidewalk:

vegetable market

vegetable market selling kaddoo and other things

A vendor sorts vegetables next to a railway track as a train passes by, in Dhaka on September 10, 2012. (Andrew Biraj/Reuters)

A vendor sorts vegetables next to a railway track as a train passes by, in Dhaka on September 10, 2012. (Andrew Biraj/Reuters)

Sidewalk vegetable seller from suvisworld.wordpress.com/

Sidewalk vegetable seller from suvisworld.wordpress.com

It is known to me and other Sindhis as ‘kaddoo’. It is so devoid of glamour that if you call someone a ‘kaddoo’ you may as well call them a doofus. But don’t underestimate it, because the kaddoo has mystique. For one thing, it is one of the oldest cultivated plants in the world. Humans have been eating it for ten thousand years. Recently some stands of wild kaddoo were discovered in Zimbabwe, which is probably where it originated. News of the cultivated kaddoo seems to have spread like wildfire, from Africa to Asia to the Americas; the kaddoo discovered America before Columbus.

Check out its pretty flower:

Kaddoo flower

Kaddoo flower

Like other plants from the Cucurbitacae family (squashes, melons and gourds), it is a vine and climbs by means of tendrils. Kaddoo flesh is pale, watery and very mild. Some would say boring. It cooks down to become squishy and somewhat gelatinous. The skin is thin and pale green, but one does have to peel it before cooking. The seeds of the young fruit are quite edible.

Calabash

Calabash

So where is the mystique? I knew that kaddoo is also known as lauki, bottle gourd, opo or dhoodhi, but I didn’t know that it also goes by the romantic name of Calabash. In India we mostly eat this as a young vegetable, when its peel and seeds are rather soft. But apparently when it ages, the peel hardens, the flesh dries up, leaving a sort of bottle behind; In this form, it is called a calabash. It has been used by old cultures as a vessel, or even as a musical instrument. Apparently the fact that the size of these gourds roughly matches the size of the human head gives it its resonant qualities.

Sitar parts

Sitar parts

SitarKaddoo

Musical instruments, hmm…what kind? Some tribal folksy thing no doubt, that street performers play and bystanders throw change at? Sure…but also, think Ravi Shankar and the sitar. The calabash is used for the shell of the deeply buzzy and resonant sitar…the main resonating chamber of which is called…wait for it…the kaddoo.

QED.

Kaddoo koftas in gravy.

kaddoo koftas

kaddoo koftas

Ingredients:

  • One large kaddoo, peeled, quartered and seeded
  • Quarter cup besan
  • Half a teaspoon coriander powder
  • Some sprinkles red chili powder
  • One teaspoon aamchur
  • Salt to taste
  • 4 – 5 tablespoons oil
  • One recipe of browned onion tomato gravy

Method

Grate the kaddoo quarters. Salt it with about a teaspoon of salt and mix it with your fingers. Leave the grated kaddoo aside for about half an hour; during this time the salt will draw out most of the moisture.

IMG_0618 IMG_0619

Now you can do the rather tedious task of squeezing out the water from fistfuls of kaddoo my means of your hands. Save the water, it has some kaddoo-ness and we will use it later.
IMG_0629 IMG_0630

Meanwhile start off the process of making the browned onion tomato gravy. When it calls for water (at the end) use the kaddoo water, would you please? Lets not waste it.

The volume of the grated kaddoo will have much reduced, and it will be dry. Put in the besan and the dry spices. You do not need more salt. Mix it with your oiled fingers; it should now be amenable to form patties. Form about 6 patties and leave them side by side on a plate.

IMG_0633 IMG_0635

Panfrying them is next. Heat a non-stick pan with oil about an eighth of an inch deep. When nice and hot, put in the patties with liberal gaps around, and sort of flatten them. Let them cook for 5 – 7 minutes or until they brown at the bottom; flip them, some more oil perhaps, and cook for another 5 minutes.

The patties are ready, all that is needed is to slip them into a nicely simmering pot of the browned onion gravy.

IMG_0636 IMG_0637

And you are done. This dish goes very well with rotis/chapatis.

Browned onion-tomato gravy — let’s get this over with

Browned onion tomato gravy

Browned onion tomato gravy

Sindhi food has a ton of recipes that start with first making a browned onion-tomato gravy, then putting in whatever edible goodies you find in the fridge that day.

Browned onion gravy can make anything taste good. Those left over hard-boiled eggs from a week ago? Throw them in. The unidentifiable pulpy vegetable with the brown spots? Cut out the brown spots, throw it in, heat it through, and gloat. Lentils, beans of all descriptions, chicken, dumplings that are fried, dumplings that are boiled, in they go. Call them meatballs or call them koftas, throw them in. You could make a giant batch of the gravy, freeze it in meal-sized portions, thaw and add stuff to it — there you go, your main meal for dinner.

In fact this gravy is such a magician that it is a bit of a cop-out for an aspiring master chef, and makes me reluctant to use it too often. Think about it — if you are a doctor, how respected would you be if your advice for every ailment is — ‘take two aspirin and call me in the morning’? It might work but it is too easy. But this is still an indispensable skill to have in your Indian cooking repertoire, so let us take our two aspirin and learn to do this right.

Browned Onion-tomato gravy

Start with reading this recipe — how to caramelize onions. That is going to be our first step. This recipe makes enough for a base for the main meal for 2 – 4 people.

Ingredients:

  • One medium-large onion, chopped fine, or sliced thin.
  • One large or two small tomatoes, roughly chopped.
  • 3 – 4 large cloves garlic, minced
  • Half inch piece of ginger, minced
  • 1 – 4 serrano chilies to your heat tolerance, sliced
  • Half a teaspoon whole cumin seeds
  • Half a teaspoon coriander powder
  • Quarter teaspoon turmeric
  • Half a teaspoon salt
  • 2 – 3 tablespoons oil

Method:

Heat oil in a wide thick-bottomed pan. When it shimmers put in the cumin seed; when that sizzles, the onion and caramelize it.

Onions, garlic, IMG_0622 IMG_0623 IMG_0624

At this point add the ginger, garlic, chili, and let them cook on medium heat for a couple minutes. Now put in the tomato. Sprinkle some salt over. The thing about the tomato is that is has to liquefy, then mostly dry up. First, the combination of the heat and the salt will make it release its liquid. Then, cook some more on that wide-open pan of yours, and the liquid will evaporate. The remains of the tomato will combine with the caramelized onion to create a rough paste.

IMG_0627 IMG_0628

Browned onion tomato gravy

Browned onion tomato gravy

At this point the dry powders can go in. Give them a stir, and then put in some water; the amount depends on what you are trying to use the gravy for, anywhere from half a cup to a cup.

Bring the water to a boil, and let it simmer for about 5 – 7 minutes.

The gravy is basically done. But you can take it into multiple directions from here:

  • run it through a blender to get a smoother sauce
  • add some cream or milk to make it creamy
  • or add a cashew puree to make it creamy that way
  • add garam masala, extra chili in the form of red chili powder, cumin powder, or other spice mixture of your choice
  • or use it as is.

The Tahoe gratin

Tahoe Gratin

Tahoe Gratin

We spent labor day in a rented cabin in the Tahoe region. We had a state of the art kitchen at our disposal, a warm cozy evening for dining in, a few vegetables in the fridge, but no spices whatsoever. What’s an Indian cook to do?

Gratin!

I love gratins — the creamy cheesy crusty casseroles. I was first introduced to gratins in an strange fashion — a pure vegetarian Gujarati restaurant in Bombay had a ‘Vegetable Au Gratin’ on the menu and it was delicious. Restaurants in India have this strange quirk where the advertised cuisine hardly matters — a South Indian dosa restaurant will have an entire Indian Chinese menu, and throw in a club sandwich as well. They don’t seem to believe in specialization of cuisine.

Sort of like the proprietor here at The Odd Pantry you say? Hmm.

At any rate, this is a pure vegetarian gratin, and it is built in layers of potato, cauliflower and corn…all vegetables with distinct flavors that nevertheless that have a certain savoriness that unites them.

The Tahoe gratin

Ingredients:

  • 1 large red potato or 2 medium
  • Half a head of cauliflower
  • Half a pound bag of frozen corn kernels
  • One and half cup milk
  • 1 – 2 tablespoons butter
  • 1 – 2 tablespoons whole wheat flour (same amount as butter)
  • salt to taste
  • A 2″ by 2″ by 2″ block of good sharp cheddar cheese

Method:

In this dish I precook all the vegetables to minimize and equalize the gratin baking time. The other principle I follow is to salt each layer on its own.

First, the potatoes. Slice the potato as thin as you can get them (eighth of an inch). Put them in a pyrex container, add salt enough for the potatoes, and submerge them in half a cup milk. Microwave for 2 – 3 minutes and then set aside.

IMG_0578 IMG_0579

Next the cauliflower. Slice the florets into quarter inch thick slices, put them in a bowl, add some salt, and once again, microwave for 2 – 3 minutes and set aside.

IMG_0580

Next the corn. Same routine — put in a bowl, add salt enough for the corn, and microwave. With the frozen corn all we are trying to do is thaw them.

Vegetables are ready. Let’s make the bechamel sauce. Heat the butter in a small pot. When it melts, add the flour and stir, stir, stir on gentle heat. It will foam and bubble and perhaps turn a shade darker. Now put in the milk. Stir with your wooden spoon for dear life as you slowly pour the milk in. You may need to resort to a whisk, the idea is we are trying to not have any lumps. Keep the heat gentle. You can also pour in any extra milk from the potato cooking bowl. Once all the milk has gone in, and the mixture is smooth, you can up the heat and bring to a boil. Add salt enough for this sauce.

IMG_0581 IMG_0582 IMG_0584

Once it comes to a boil, turn it off after a minute. We are ready to compose the layers. In a flat baking dish, first layer in the potato slices, trying to keep even thickness. Next put on the cauliflower florets in a layer. Next the corn. Now pour the bechamel sauce all over the vegetables, pushing and prying with a spatula to get it everywhere.

IMG_0583

Cut the cheese up into tiny cubes. Cover the top of the casserole with cheese. Cover with foil and bake for 45 minutes at 425 F. In the last 10 minutes, take the foil off to get it to brown. If you want more of a brown crust, stick it under the broiler for 5 extra minutes.

IMG_0585 IMG_0587


Here are some other ideas for other vegetables to add to the mix: peas, leeks, roasted zucchini.


Creamy tomato korma with 2 jewels

Tomato korma

Tomato korma

My favorite Indian restaurant dish has always been the navratan korma. Creamy and subtly flavored, it is traditionally made with nine separate ‘floaters’ that make up the nine jewels (nav=nine, ratan=jewel). The problems with replicating this dish at home are many and various:

  1. I can never bring myself to put in the sheer amount of butter and cream needed in this recipe
  2. my grinds are never as smooth and as fine as in restaurants
  3. the nut kormas that I have made are, shall we say, lacking in flavor
  4. I never have nine things, all together, in the fridge at the same time, to use in the korma
  5. It goes well with naan but I don’t have a tandoor, so I need a recipe that will go well with rice or roti

Did you think this was going to be just a litany of my troubles? No, Dear Reader, I have found a good substitute! Here it is. A poor man’s korma with two jewels instead of nine, and a creamy tomato base instead of whatever they use. Feel free to up the jewel count when you make this at home. Feel free to take any other ‘Julia Child’ steps, such as peeling and seeding the tomato for a smoother sauce. I certainly didn’t but I’m rustic that way.

Creamy tomato korma with 2 jewels

Ingredients:

IMG_0564[1] IMG_0565[1] IMG_0572[1] IMG_0568[1]

  • 2 tablespoons ginger-garlic-chili paste
  • 2 cups tomato puree, made by simply halving about 5 tomatoes and giving them a spin in the blender
  • 1 bay leaf
  • 2 black cardamoms
  • 4 green cardamoms
  • 1 small stick cinnamon
  • 4 cloves
  • 2 tablespoons ghee
  • 1 tablespoon dry fenugreek (methi) leaves or half a bunch fresh
  • A pinch of nutmeg, grated
  • Salt to taste
  • quarter cup heavy cream or milk
  • Jewel #1: half a pound of paneer, cubed into small cubes
  • Jewel #2: Big handful frozen peas
  • (other possibilities: chopped pineapple; cashews; green beans, in inch-long pieces; carrots, cubed; cauliflower florets; slivered almonds; bell peppers)

Method:

Heat the ghee in a thick-bottomed pot on medium heat. When fully melted, throw in the whole spices — the cloves, cardamoms, cinnamon, bay leaf. They need to cook for a minute, then in goes the ginger garlic paste. Let it sizzle and look ‘cooked’ which is one step before looking ‘browned’. At this point put in the tomato puree and an additional cup of water.

IMG_0566[1] IMG_0567[1]

Bring this mixture to a boil and let it roil away gently for about 10 minutes. It will reduce some and its lusciousness will be greatly enhanced. At this point add the salt, fenugreek leaves, and grate some nutmeg in. Let it cook to meld another five to seven minutes. All this cooking can be done at medium heat.

Tomato korma, the base is cooked

Now the jewels go in. There is no need to thaw the peas before adding them in. The peas can go in first, then the cubed paneer. If you have other ‘jewels’ that need to be cooked to fully enjoy them, I suggest you precook them by blanching or microwaving, with some salt, before popping them into the sauce to finish off.

IMG_0573[1]

In any case my jewels did not need much cooking. Once the peas thaw they are quite done, and the paneer just needs heating through. This happened in another few minutes.

What is a korma without cream? So just before serving, lower the heat, add the quarter cup of cream and gently stir in, adjust for salt, and serve with some nice long-grained rice.

IMG_0574[1]


(This recipe is one of the 1000 found in this book.)

Sookha aalu, Indian home fries

All right, Americans, I will admit it, you are better at naming recipes than us Indians. The dish called ‘sookha aalu’ which is made in different guises all over India means nothing but ‘dry potato’. Descriptive, yes, but lacks a certain punch.

Some American marketing geniuses

American marketing geniuses

Then the American marketing geniuses come in, and decide that any recipe name is improved by bunging in the word ‘home’. And on top of that, they came up with the word ‘fries’…. “Guess what guys, we won’t include the word ‘potato’ at all…a light touch…a bit of indirection.”

Genius! Home fries. My point here is that India has legions of most excellent sookha aalu recipes and really they are almost exactly what people in America recognize as home fries, except with Indian spices. Here is my version, and it is most delectable.

Sookha Aalu, Indian home fries

Ingedients:

  • 1 large red potato or 2 medium or several small.
  • salt to taste
  • half a teaspoon mustard seeds
  • half a teaspoon red chili powder
  • half a teaspoon coriander powder
  • 1 teaspoon dry mango powder (aamchur) or substitute with lime juice
  • 2 tablespoons oil

Method:

Rinse the potato and remove the eyes. Microwave it for 5 minutes or so, or long enough to almost cook it right through.

When it comes out of the microwave, wait till it is cool enough to handle, and cut it into pieces. First, Do Not Peel. If you do you will regret it. The crisped up peel is definitely the most appealing part of this dish.

Next, think about the shapes of the pieces. You could do cubes, if that is your fancy. Don’t make them bigger than about half an inch in width. Or you could do slices, about eighth of an inch thick. Either way works, but choose a method and stick with it, unlike me, I chose slices, then switched to cubes, then had a bit of a hodge podge.

Heat oil in a non-stick pan. When it shimmers put in the mustard seeds. When they pop put in your cut up potato. Stir them around on medium-high heat. Sprinkle salt over in two stages — once, after you have tossed the potatoes with the oil, and next, after  a few minutes, and more stirring.

IMG_0556 IMG_0558 IMG_0559 IMG_0561

You will see them begin to crisp and brown in a few minutes. Keep stirring once in  a while, and cook in all for about ten minutes. Towards the end of cooking time, sprinkle on the chili powder, the coriander powder and the dry mango powder. Adjust for salt and you are done.

Introducing the Eggnach

Eggnach with roti

Eggnach with roti

My People — the Sindhis — have made a lot of contributions to world culture, but I must say this ranks as an important one. Sindhis discovered that spinach and eggplant, when cooked together, meld well, marry well, and make a tasty nutritious brew.

Not only is this technique explored in the very famous Sai Bhaji, but in this rather less well-known dish as well. It goes well with rotis, but would go on the side of rice very well too, if you have some plain yogurt on the side. A very nice accompaniment would be yellow rice — cooked with some garlic, salt and turmeric powder (recipe forthcoming).

I found this recipe in this book and as usual made some modifications.

The Eggnach — eggplant and spinach dish

Ingredients:

  • 1 bunch spinach
  • 1 regular-sized eggplant
  • 1 medium tomato or 2 small ones
  • 4-5 cloves garlic
  • half and inch piece ginger
  • 2 serrano chilies or several smaller birds-eye chilies
  • half a teaspoon coriander powder
  • half a teaspoon cumin seeds
  • half a teaspoon red chili powder
  • salt to taste
  • 2 tablespoons oil
  • 1 tablespoon ghee (optional)

Method:

Rinse and chop the vegetables.

IMG_0547 IMG_0548 IMG_0549 IMG_0550


Chop the garlic, ginger and chili. Give them a pounding in a mortar and pestle after sprinkling a bit of salt on it to add a bit of roughage and to draw out moisture.

IMG_0546 IMG_0551

A note about salt: it draws out moisture! This is an incredibly useful fact that helps out in various ways. In this case, I pound it with a bit of salt, so that the paste self-makes itself, without adding even a splash of water.

Salt also pre-cooks food as it draws out the moisture, at least that is how I think of it. If you mince garlic, and salt it, in 10 minutes you will see that it has turned mushy and wet, and by the way, the taste of the garlic will not be as aggressive as when it is raw.

So anyway, getting back to our job. Pound those guys to get them to paste up. You don’t need to go the extra mile, just a simple smashing will do.

Heat oil in a thick-bottomed pot. When it shimmers, throw in the cumin, red chili powder and coriander powder. Now enters the garlic/ginger/chili paste. Let it sizzle. Now in tumble all the vegetables, chopped. Salt them, stir them around, cover, and cook for 15-20 minutes on medium first, then, when it comes to a boil, on medium-low.

IMG_0553 IMG_0554 IMG_0555 IMG_0557

Everything you have in there is quite mashable by this point. So attack it with a potato masher or simply the back of your spoon.

IMG_0560

Eggnach mashed

If you like, top it with a teaspoon of ghee, and possibly a sprinkle of lemon juice, and you are done.


Simple dal series – Part 3, tuar dal with spinach

(Part 2 of this series is here.)

Here is the pigeon-pea, which has nothing whatsoever to do with pigeons, except that they are both full of protein:

Pigeon pea, tuar dal

Pigeon pea, tuar dal

Tuar dal

Tuar dal

And here is some dementia-fighting spinach:

Spinach

Spinach

And this is what you get when you marry them: spinach dal.

Spinach dal

Spinach dal

Eat enough of this, and you will be lifting weights while remaining completely undemented. But that’s not all. Spinach is a good choice to put into any dal, because it melts in, rather than remain in bits. Whether your intention is a soupy dal or more of a porridgy one, spinach fits right in.

Spinach with tuar dal

Ingredients, for boiling:

IMG_0533[1] IMG_0535[1]

IMG_0539[1] IMG_0540[1]

  • Half a cup tuar dal (dehulled and split pigeon peas)
  • spinach — one bunch (use half a bunch if you want it more yellow than green)
  • 5-6 cloves garlic, smashed
  • 1-2 serrano chilies
  • half a teaspoon turmeric

Ingredients, for seasoning (all of these are optional, but do try to use at least one spice):

Seasoning spinach dal

Seasoning spinach dal

  • 1-2 tablespoon ghee
  • sprinkle of asafetida
  • half teaspoon mustard seeds
  • half teaspoon cumin seeds
  • half teaspoon fenugreek seeds
  • half teaspoon or to taste red chili powder
  • salt to taste
  • Half a lime or lemon squeezed

Method:

Rinse and soak the dal in hot water for an hour or more. It will double in volume, or more. Put the drained dal in a thick-bottomed pot along with the turmeric, garlic, and chili. Add two and half cups water and bring to a boil.

Now. I say this with every dal recipe but it bears repeating. When dal first comes to a boil it will froth up with the rage of a volcano. Let it do so while the pot is uncovered. This way you can watch and the foam is not likely to end up on your burner. Once the foam has spent itself, partially cover, turn it down to simmer for an hour and half.

In the middle of cooking time, put in the washed and chopped spinach. Cover and cook on until the dal grains are soft. Give the soupy stuff a whisk with a whisk or a swoosh around with one of these, a mandheera. Add salt and keep it on a low simmer.

Spinach dal before seasoning

Spinach dal before seasoning

Now for the seasoning. Heat the ghee on medium high heat. By the way this is one dish where I do recommend ghee rather than oil because it enhances the flavor in a very nice way. Of course oil would work too.

When the ghee is completely melted, throw in the seasonings in this sequence: first, the asafetida and the red chili powder; then the cumin seeds; when they sizzle, the mustard seeds; when they pop, the fenugreek seeds. Don’t cook these longer than about 10 seconds, because they will turn bitter if so.

Turn off the heat and pour into the dal. Stir, stir, stir. Simmer for a few minutes to meld the flavors. Squeeze some lemon/lime juice to it to brighten the flavor.

I love this dish with rice but other people recommend rotis. I never would, so there.

IMG_0544[1]

Rice with spinach dal

In which the Manchurian Cauliflower gets brainwashed by the Californians

Gobi Manchurian with fried rice

Gobi Manchurian with fried rice

There is a famous dish in India called Cauliflower Manchurian, which no actual Manchurian person would probably recognize. For that matter, those actual Manchurian people, from the mythical land of Manchuria? They probably wouldn’t call themselves Manchurian either. This is an ancient term that I believe came from the tribe of Manchu, but then became a generic term for a region around the north east of China, and a part of Mongolia. As far as I could determine, it is now used to refer to only two things: The film/novel ‘The Manchurian Candidate’, and this dish — Gobi/Cauliflower Manchurian.

A long time ago a Chinese community that had settled in eastern India created this dish, with Chinese ingredients but an Indian sensibility. They were either from the ethnic Manchu tribe, or perhaps they picked a word that suggested something vague, like ‘from yonder eastern lands’?

In any case, this is one of the most famous Indian Chinese dishes, served in restaurants, and also recreated in many homes, including mine as I was growing up. I recently remembered this dish and made it at home to go with fried rice. As is my wont, I modified it; it is already a hodge-podge between Indian and Chinese, and I added Californian to the mix — what that means, is that instead of deep-frying the cauliflower, I microwaved and roasted it, in order to make it somewhat healthier. This made enough for dinner for two, with no leftovers.

It got high marks from my foremost customer and critic, my husband. So here goes:

Californian Cauliflower Manchurian

Ingredients:

  • Half a cauliflower, cut into half inch wide florets
  • 3-4 cloves garlic
  • half an inch piece of ginger
  • 1 serrano green chili
  • 2 tablespoons soy sauce
  • half a cup chicken broth
  • 1 tablespoon chili sauce, like Lee Kum Kee or Sriracha
  • 1 tablespoon cornstarch
  • 1 tablespoon Ketchup or Worcestershire sauce
  • salt to taste
  • 2-3 tablespoons oil

Method:

Cheddar cauliflower

Cheddar cauliflower

Rinse the cauliflower florets. Set them in a plate and microwave on high for 3 minutes. This will get them cooked on the inside and avoid the need to deep-fry. Next, for surface browning, rub salt and 1 tablespoon olive oil over them, and pop into a 425 F oven for 20 minutes, turning once in the middle. In retrospect I should have broiled it for the last 5 minutes to get it even browner.

Minced ginger, garlic, chili

Minced ginger, garlic, chili

Meanwhile prepare the sauce. Mince garlic, ginger and chili and keep aside.

Liquid ingredients for manchurian

Liquid ingredients for manchurian

In a bowl, mix the chicken broth, soy sauce, chili sauce, cornstarch and ketchup or Worcestershire sauce.

Heat two tablespoons oil in a wide pan. When it shimmers, put in the garlic, ginger and chili, to saute them gently. By this point the cauliflower should be ready and browned, put it into the pan and stir the seasonings with it. Doesn’t hurt to adjust the cauliflower for salt at this point, even though the salty soy sauce is yet to come, one wants the cauliflower to not be bland in itself.

Cauliflower sauteing

Cauliflower sauteing

Now it is time for the liquid mixture to be poured in. Stir, stir, stir to coat the florets. As it comes to a boil, the cornstarch will congeal and make the mixture shiny. You want it to go all over the cauliflower.

IMG_0521[1] IMG_0522[1]

Your dish is ready, but you need garnish. This is what I used for garnish: sliced chili in some white vinegar, heated for 20 seconds in the microwave.

Chili vinegar

Chili vinegar

We had it for dinner with this lovely fried rice with purple cabbage, the recipe for which will have to come some other time.

Fried rice with purple cabbage

Fried rice with purple cabbage

Taro the terrible

Kachaalu took

Kachaalu took

Today more Sindhi food — a snack, this time, called kachaalu took.

Here is taro. It is a root or tuber, grown underground in the tropics all over the world. Also known as arbi, colocasia, kachaalu, dasheen.

Taro root

Taro root

This is one scruffy guy, as you can see. You are more likely to find it in a vegetable police lineup than in the vegetable swimsuit catalog. But I’m always happy to find it on my plate.

If you read the Wikipedia article I linked to, you might notice one thing — the countries where taro is eaten are all third world countries. This is telling. I don’t know what it is telling me, but perhaps that taro is not glamorous?

In reality this is a pretty healthy vegetable. Its leaves are large and heart-shaped, and can be eaten simply as greens or rolled around a filling. The tuber can be fried, boiled, mashed, sauted, roasted, baked, sauced, or microwaved (as we will see below) in endless variations. But whether you eat the leaves or the tuber, it must be cooked before eating, because it is somewhat toxic when raw.

The recipe below is eaten as snack either with dinner or before. Traditionally this recipe uses the double-fry method, but to make it somewhat healthier, I use the microwave and get quite comparable results. I also shallow, not deep, fry.

Kachaalu took

Ingredients:

  • A few tubers of taro
  • some salt
  • some oil
  • red chili powder
  • dry mango powder, substitute with lime/lemon juice

Method:

Rinse the tubers to get the lose dirt and hair off. Set them in a plate and microwave for about 5-6 minutes or until softened. Wait for them to cool until you can handle them, then pull the peel off. Now slice the tubers into quarter inch thick slices.

IMG_0498[1] IMG_0499[1]

Heat the oil in a non-stick pan. When it shimmers it is time to lay the slices down. Sprinkle with salt as they are cooking. Also press down on each slice with a spatula to a) get it to be in full contact with the hot oil, and b) flatten out a bit to be in even more contact.

IMG_0500[1] IMG_0501[1]

Pretty soon a delicious aroma of browning will arise, most reminiscent of bacon cooking. When you detect browning on the underside (this will take about 3 minutes on high-ish heat) flip each slice over

Sprinkle this side with salt as well. Flatten each slice with a spatula once again. In three more minutes, they will be browned on both sides.

Remove the slices to a plate and sprinkle with red chili powder and dry mango powder (aamchur). The latter adds a very necessary tang to the dish, so if you don’t have it, use lemon or lime juice instead.

I challenge any greasy-spoon diner to compete with this in sheer sinfulness!

Kachaalu took

Kachaalu took